Understand the work.
Follow every step.
A practical guide to setting up your company and managing its daily work. Follow the steps in order, or choose the task you need below.
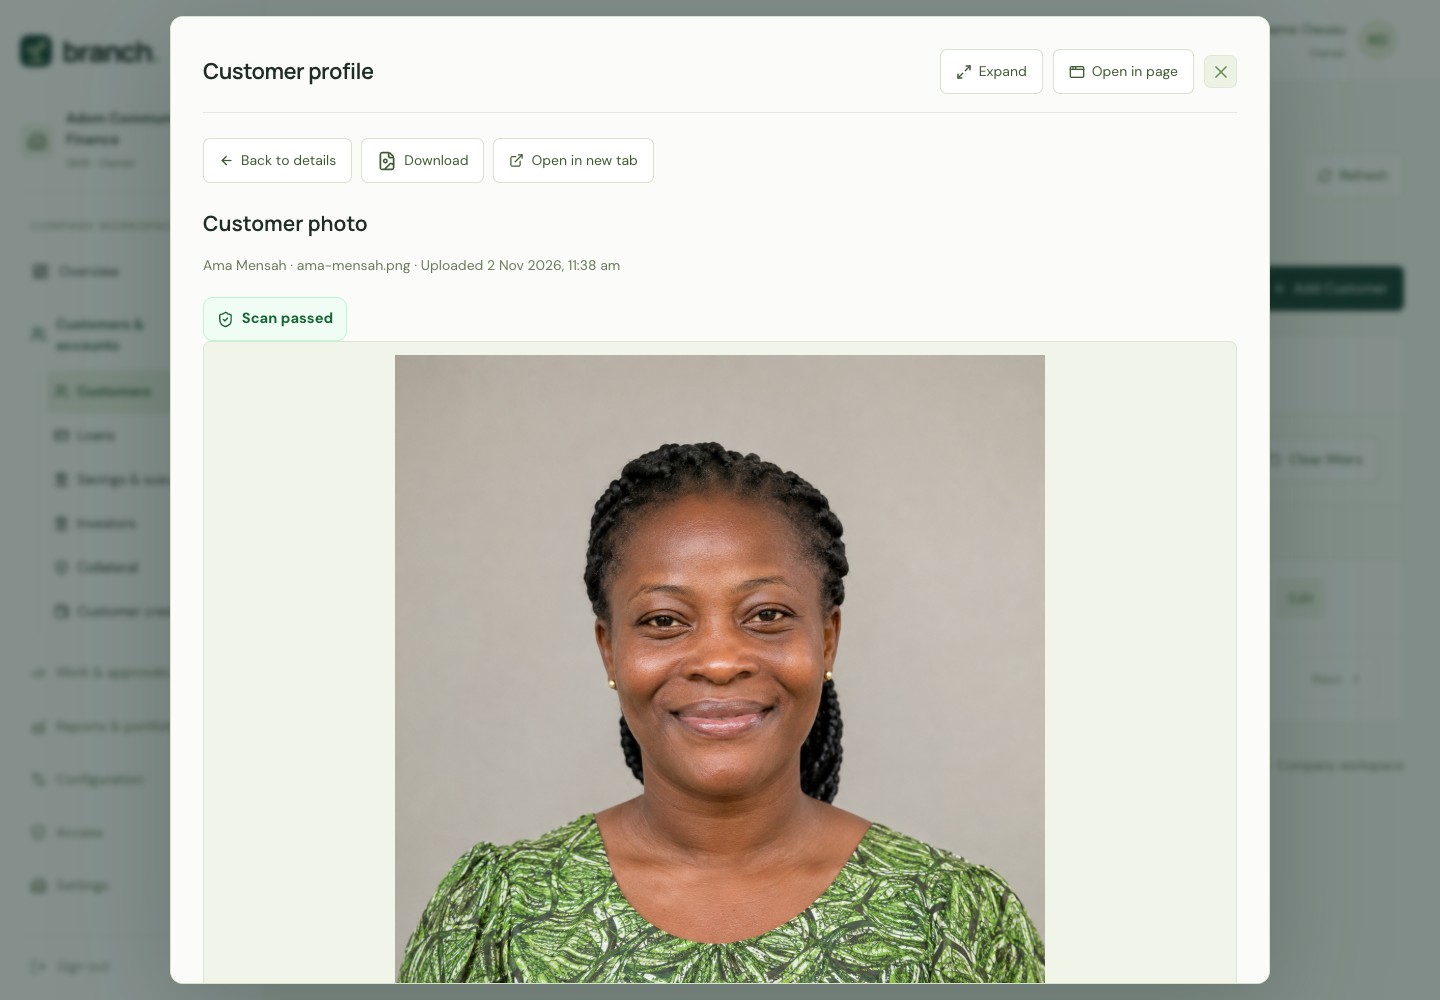
Meet Adom Community Finance and three customers with custom portraits: Ama Mensah, Kojo Antwi and Akosua Osei. Follow saved records, opened documents and exported reports, with the Branch logo used for the example company.
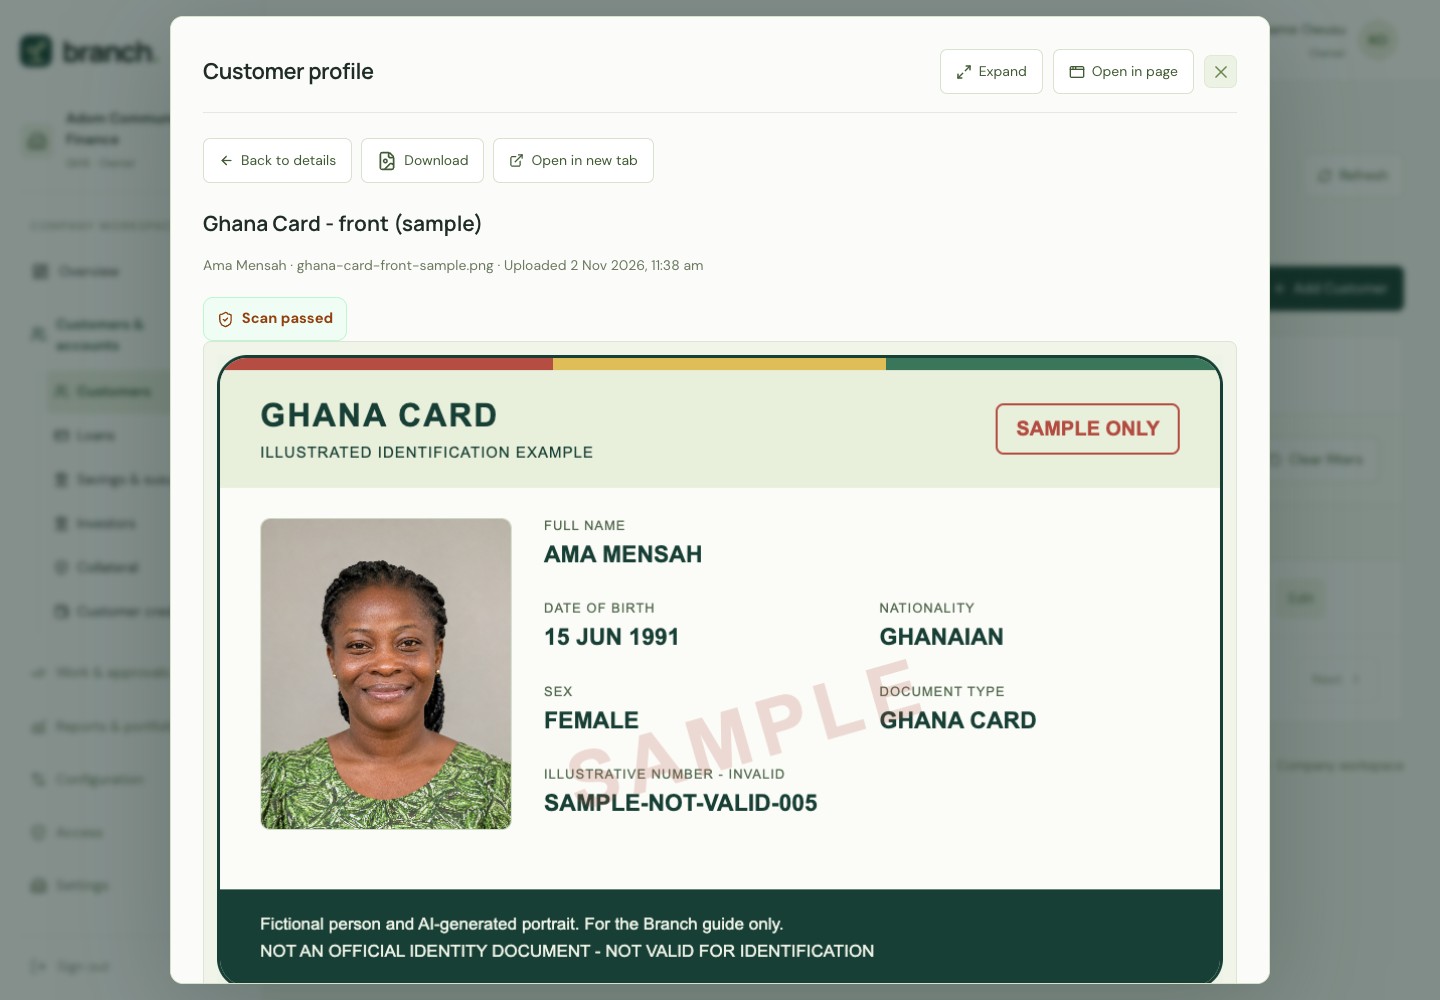
All people, identity details and financial records are fictional. The three portraits are AI-generated; the illustrated Ghana Card is marked SAMPLE and is not an official identity document. Select a screenshot to view it at full size, or open an example file to read its contents.
On a phone, select Menu to open navigation. Expand a menu group, then choose the page. Your role determines which pages and actions are available.
Create an account and sign in
Branch is a workspace for microfinance companies. Start by creating your company, or accept an invitation if you are joining an existing team.
- Who
- Company owner · All staff
- Where
- Get started / Sign in
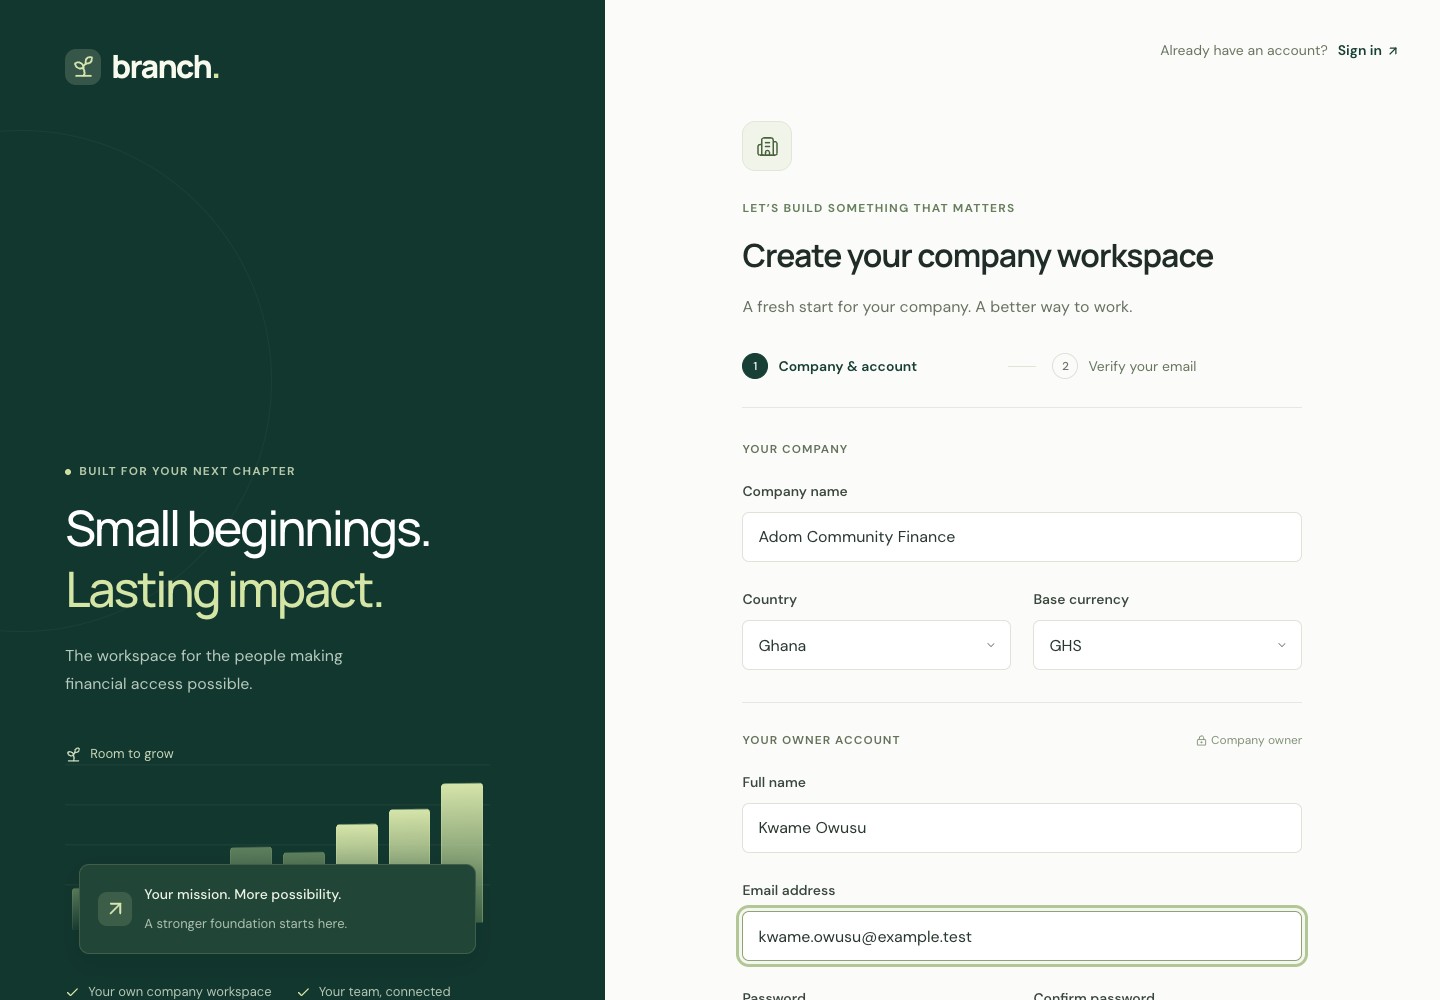
- Select Get started on the website. Enter the company name, country and base currency, followed by the owner’s name, email address and password.
- Open the verification email and select Verify email address. Then select Open your workspace. If the email does not arrive, use the resend option on the email confirmation page.
- For later visits, select Sign in and enter your email address and password. Invited staff should first open their invitation, enter their name and choose a password.
Keep in mindChoose the base currency carefully: it remains fixed after registration. Each company uses the same currency across its branches.
 View full-size screenshot
Password recovery, signing out and unavailable access
- Select Forgot password on the sign-in page, enter your account email and follow the email link to choose a new password.
- Use Sign out in the workspace menu when you finish. If the company or your staff account is inactive, contact your company administrator; a suspended company needs help from the platform administrator.
Prepare the company and your team
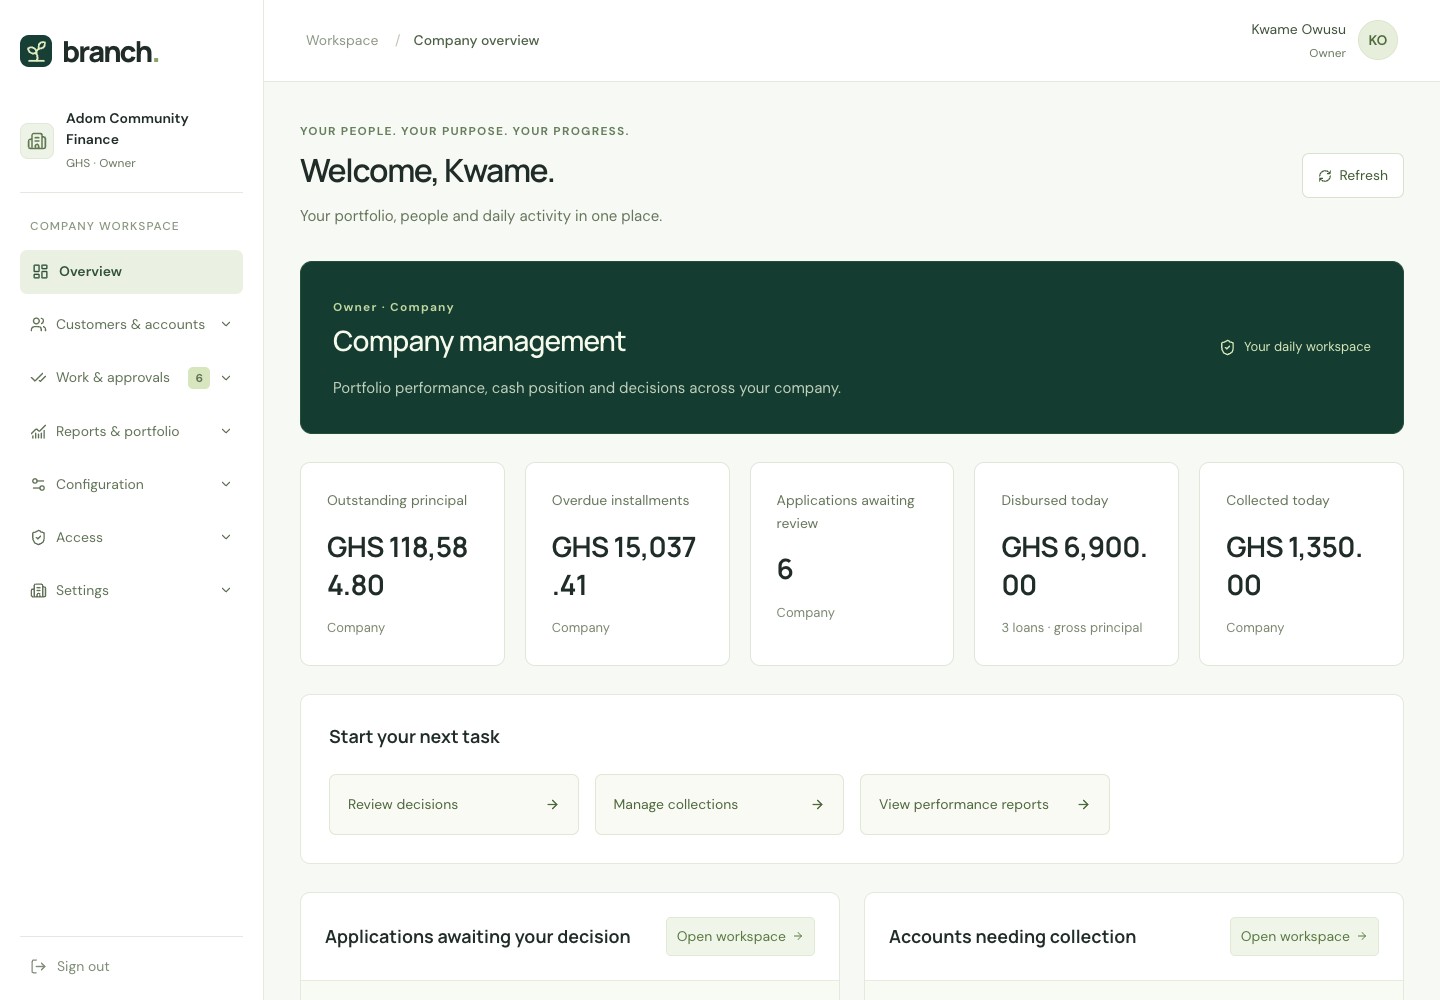
Set up the company before recording daily business. Each person receives a home screen and actions suited to their role.
- Who
- Owner · Administrator
- Where
- Settings · Configuration · Access
- Open Settings → Settings. Check the company details, business timezone and receipt prefix. Set the rules for overdue payments, advance repayments, guarantors and application documents. Enable savings and susu if needed.
- Open Configuration → Branches and add each location. Use Branch rules to set lending limits, working days and holidays for those locations.
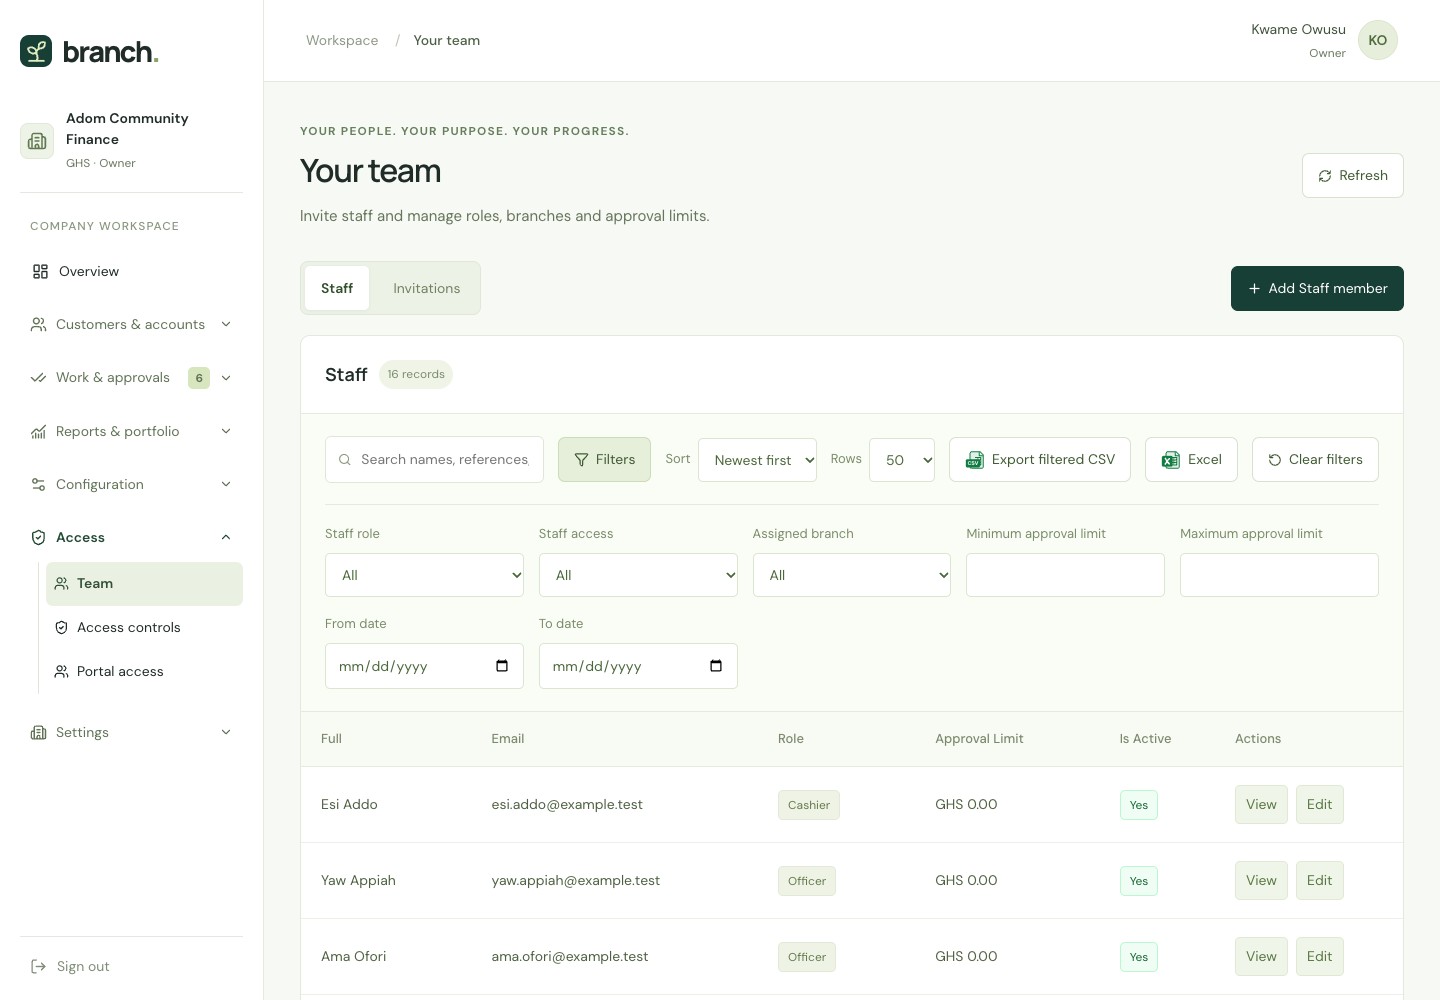
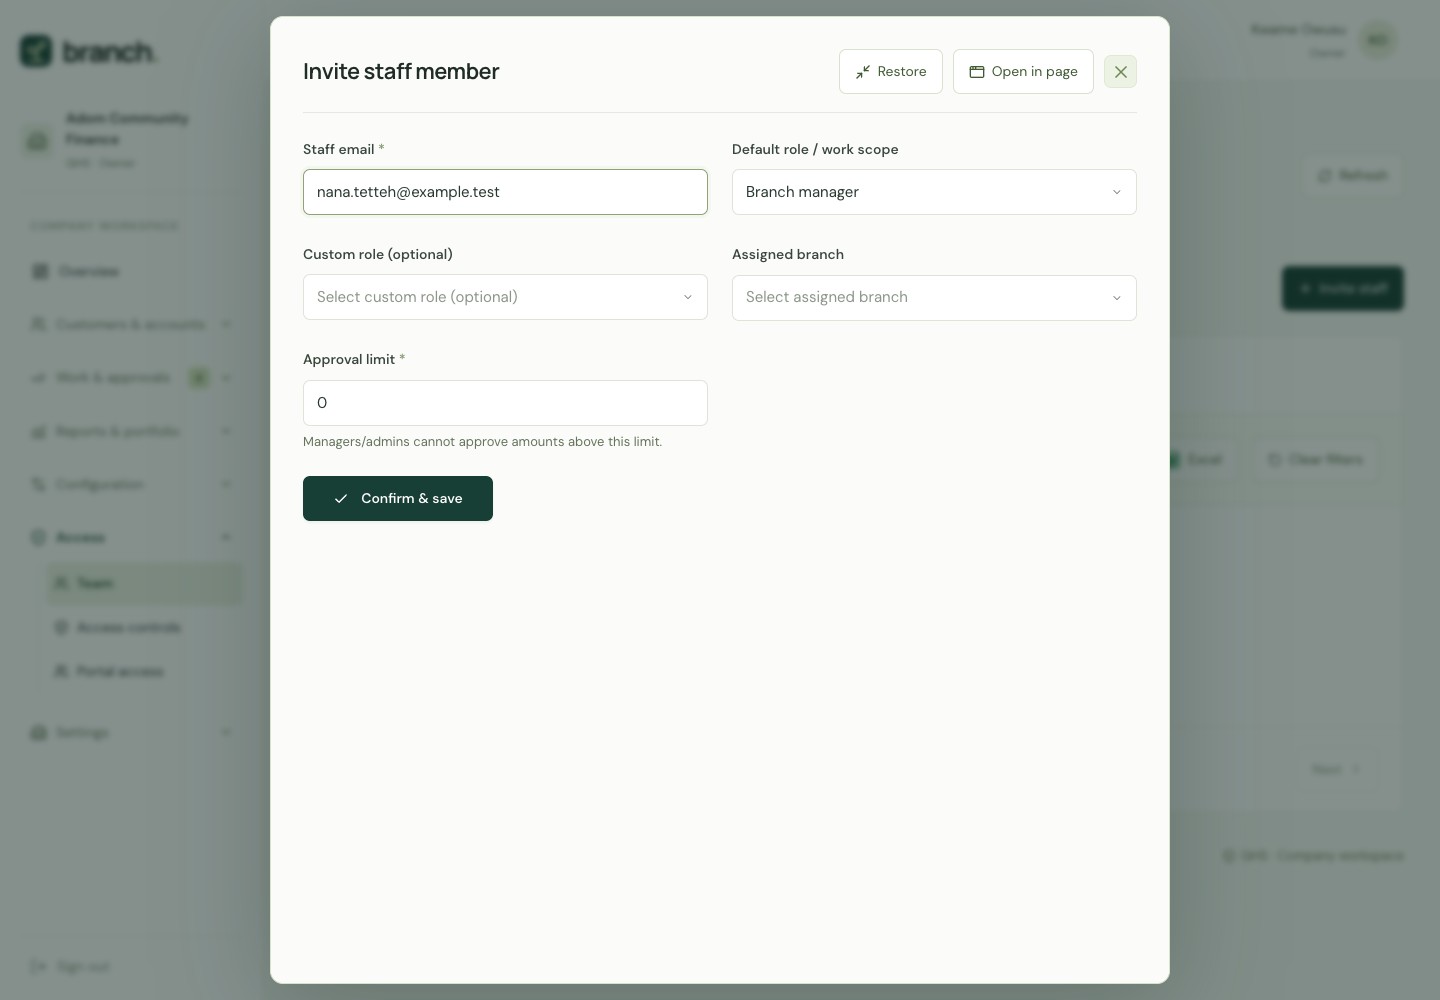
- Open Access → Team → Invitations. Select Invite staff, enter the email, role, branch and approval limit, then save. The staff member completes the invitation from their email.
- Set up loan products in Loans → Products, and deposit products if you offer savings or investor accounts. Record confirmed opening capital in Accounting before making payouts.
Keep in mindA manager or administrator needs an adequate approval limit. A limit of zero gives no monetary approval authority. Assign enough people to prepare, review and pay loans independently.
 View full-size screenshot
 View full-size screenshot
Understand the seven staff roles
| Role | Main responsibility |
|---|---|
| Company owner | Company setup, portfolio oversight, access and authorized decisions. |
| Administrator | Staff, branches, settings and permitted operations. |
| Branch manager | Applications, decisions and follow-up within their assigned scope and approval limit. |
| Loan officer | Assigned customers, application preparation and payment follow-up. |
| Cashier | Confirmed payouts, payments, deposits, withdrawal requests and receipts. |
| Accountant | Accounting, matching statements, financial reports and permitted funding work. |
| Auditor | Read-only review of records, decisions and activity history. |
Change staff access
- In Team, edit a staff member to change their role, branch, approval limit or active status. Revoke an unused invitation from Invitations.
- For more specific permissions, use Access controls. Review the affected staff before saving changes to a custom role.
- Forms open in a dialog. Select Expand for more room or Open in page to continue in the page. Open in modal returns to the dialog and retains your entries.
 View full-size screenshot
Add customers and supporting records
A customer profile brings contact details, supporting evidence and account history together.
- Who
- Owner · Administrator · Manager · Loan officer
- Where
- Customers & accounts → Customers
- Select Add Customer. Enter the individual’s or business’s name and phone number, then select the branch and assigned officer where applicable.
- Add the remaining contact and identification details. Upload a photo, identification front and back, and relevant supporting files. Business customers can also have a business certificate.
- Use Add guarantor in the customer form if another person supports the application. Enter their relationship and contact details, and attach their own identification or files. Save the completed record.
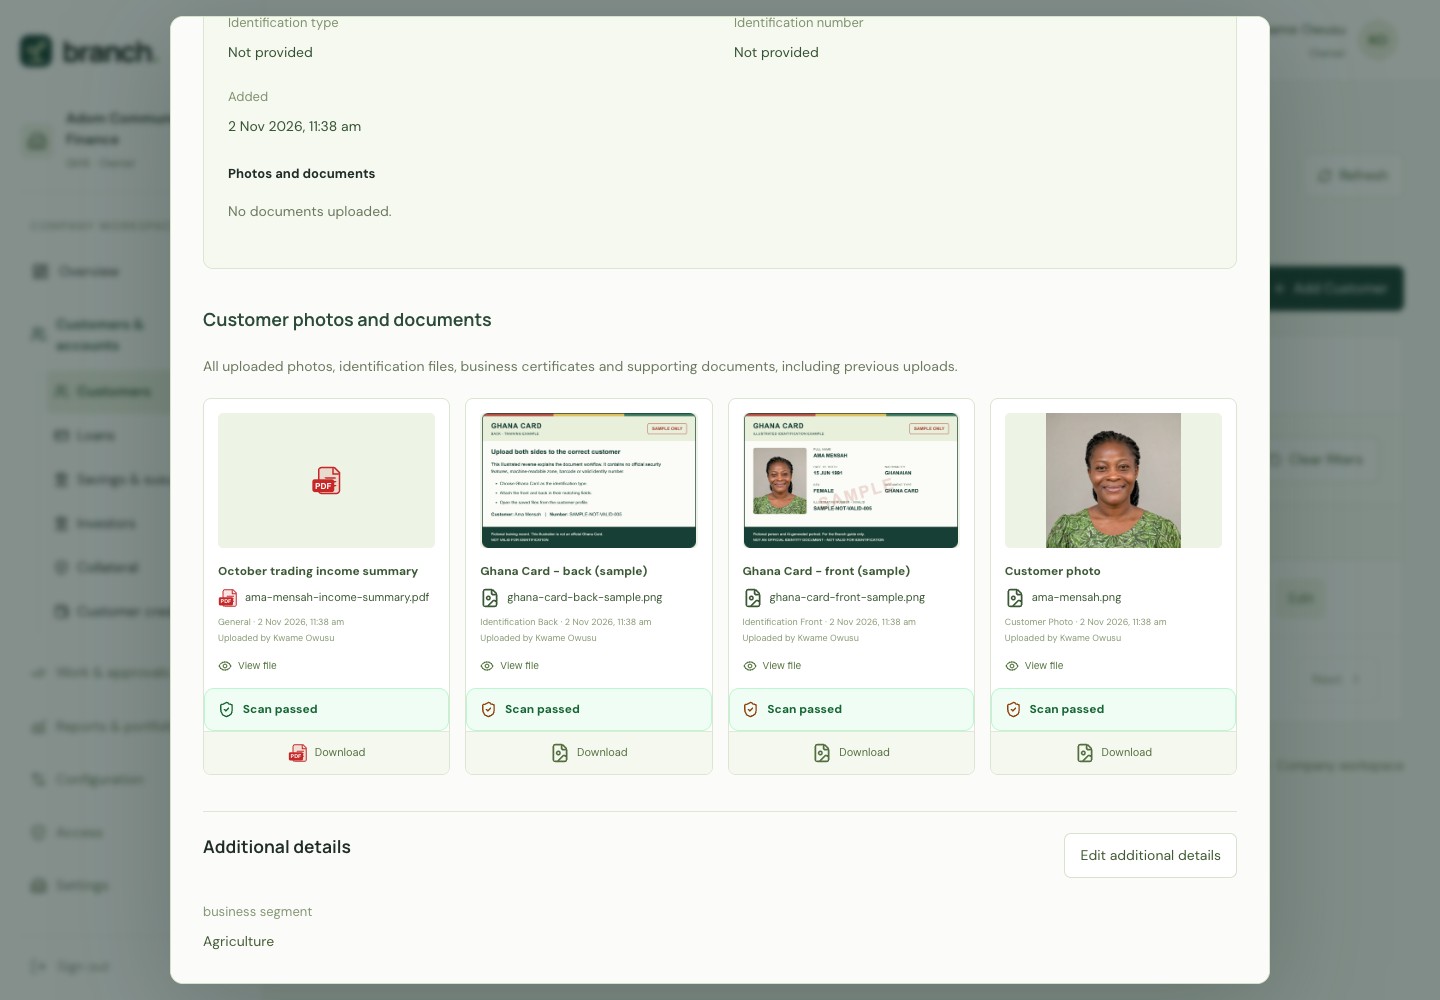
- Select the customer’s name or View customer to open the full profile. Review guarantors, documents, loans, payments and savings history. Select a file or photo to preview it.
Keep in mindPhotos use PNG or JPEG; supporting files use PDF, PNG or JPEG, up to 5 MB each. Earlier uploads remain in the record when you add a replacement photo.
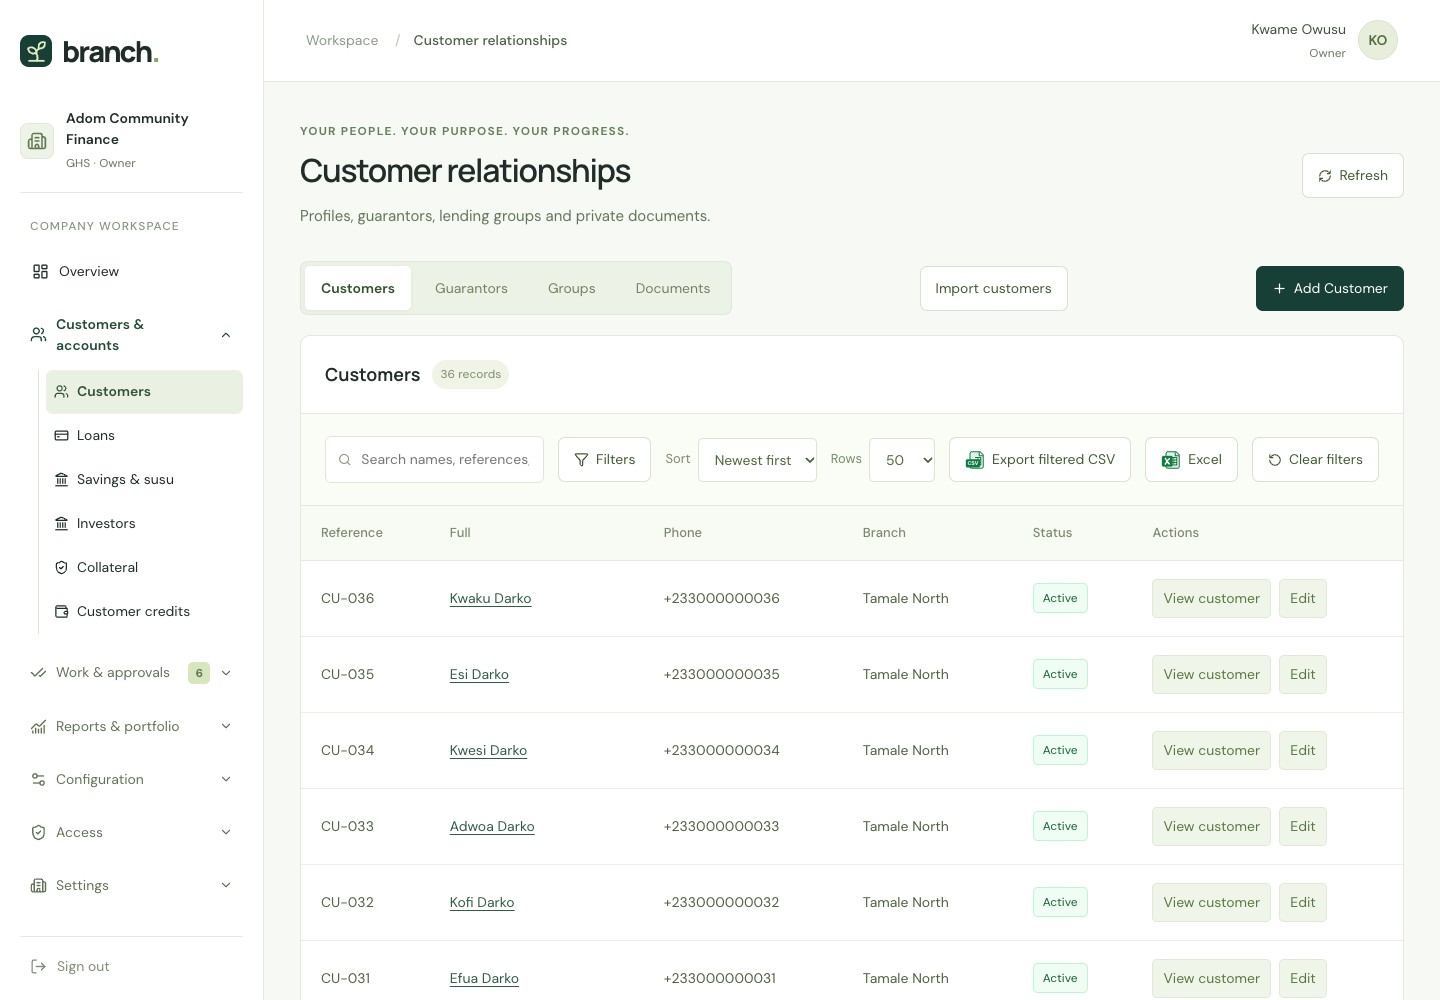 View full-size screenshot
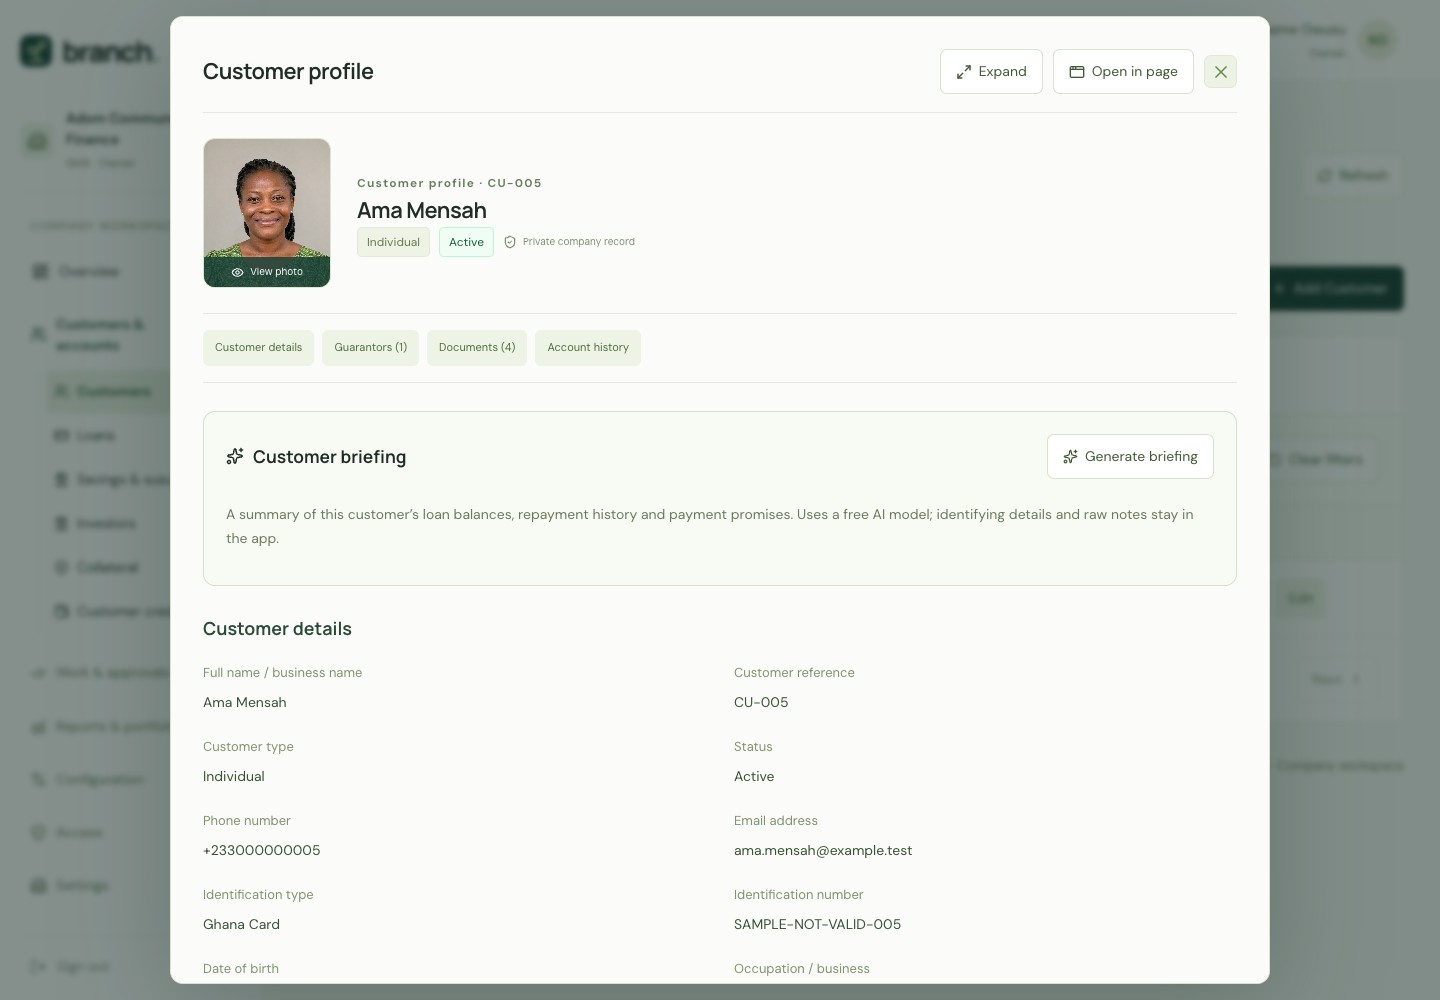 View full-size screenshot
Open the example files
Read the contents alongside the steps. These files contain fictional guide records.
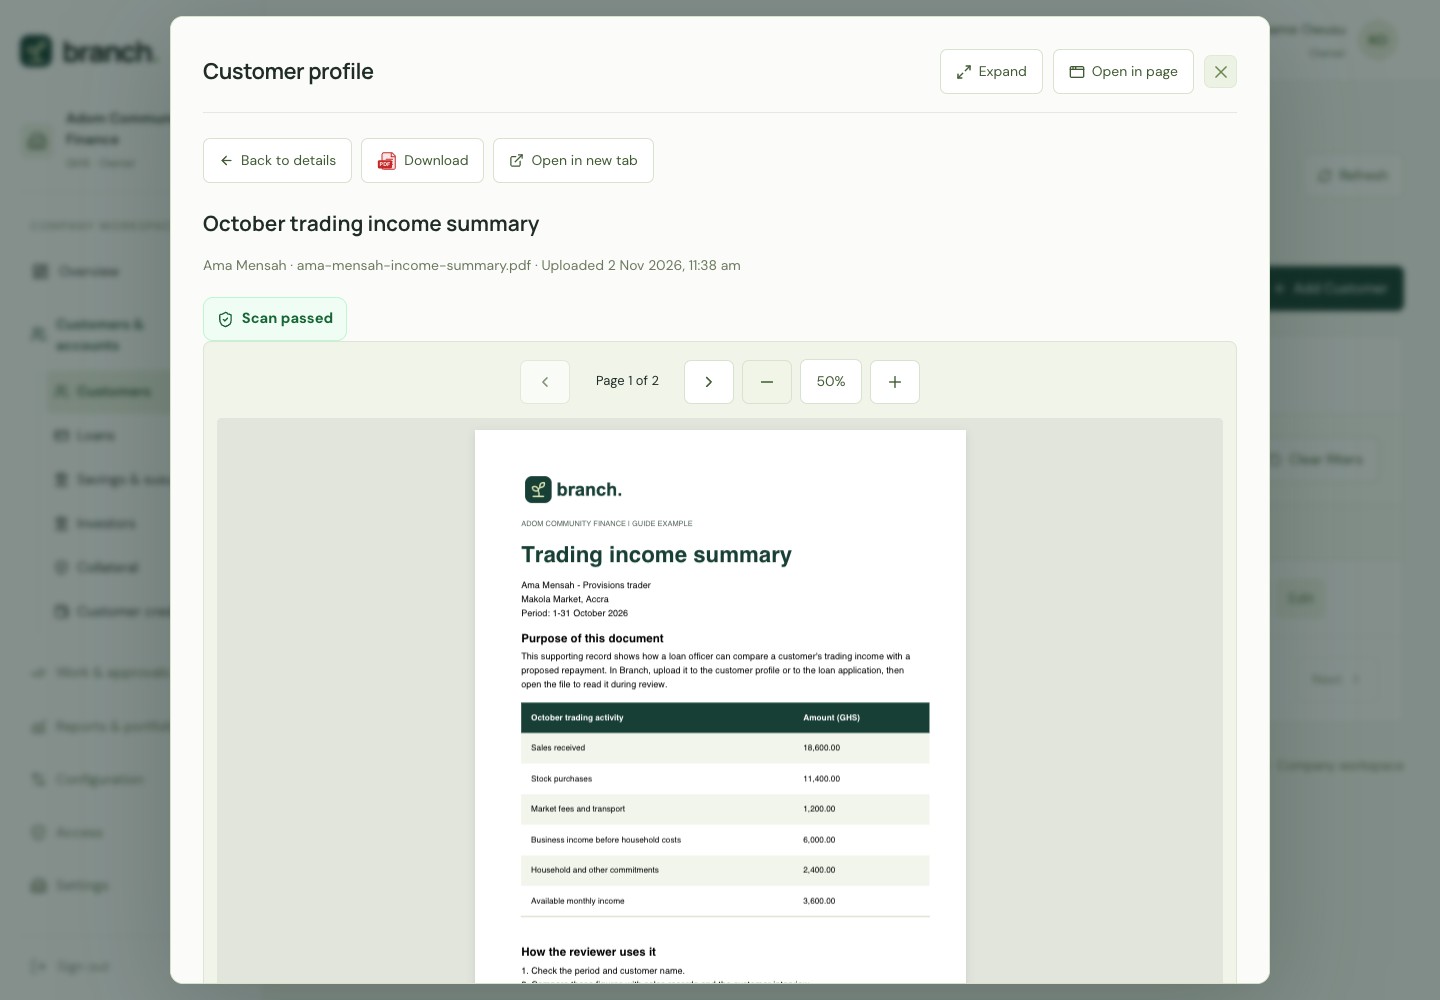
- Read the trading income summary (PDF) (opens in a new tab)
Two pages explain sales, business costs, household commitments and how to review supporting income evidence.
See the three customer portraits and identification files
- Ama Mensah, Kojo Antwi and Akosua Osei are the only three customers with generated portraits. Each photo stays attached to its matching profile.
- Open Ama’s Documents section to inspect her saved photo, identification front and back, and supporting income PDF. Select an individual file to view it.
- The illustrated Ghana Card uses Ama’s matching name and date of birth with a deliberately invalid SAMPLE number. It explains document placement without publishing a real identity card.
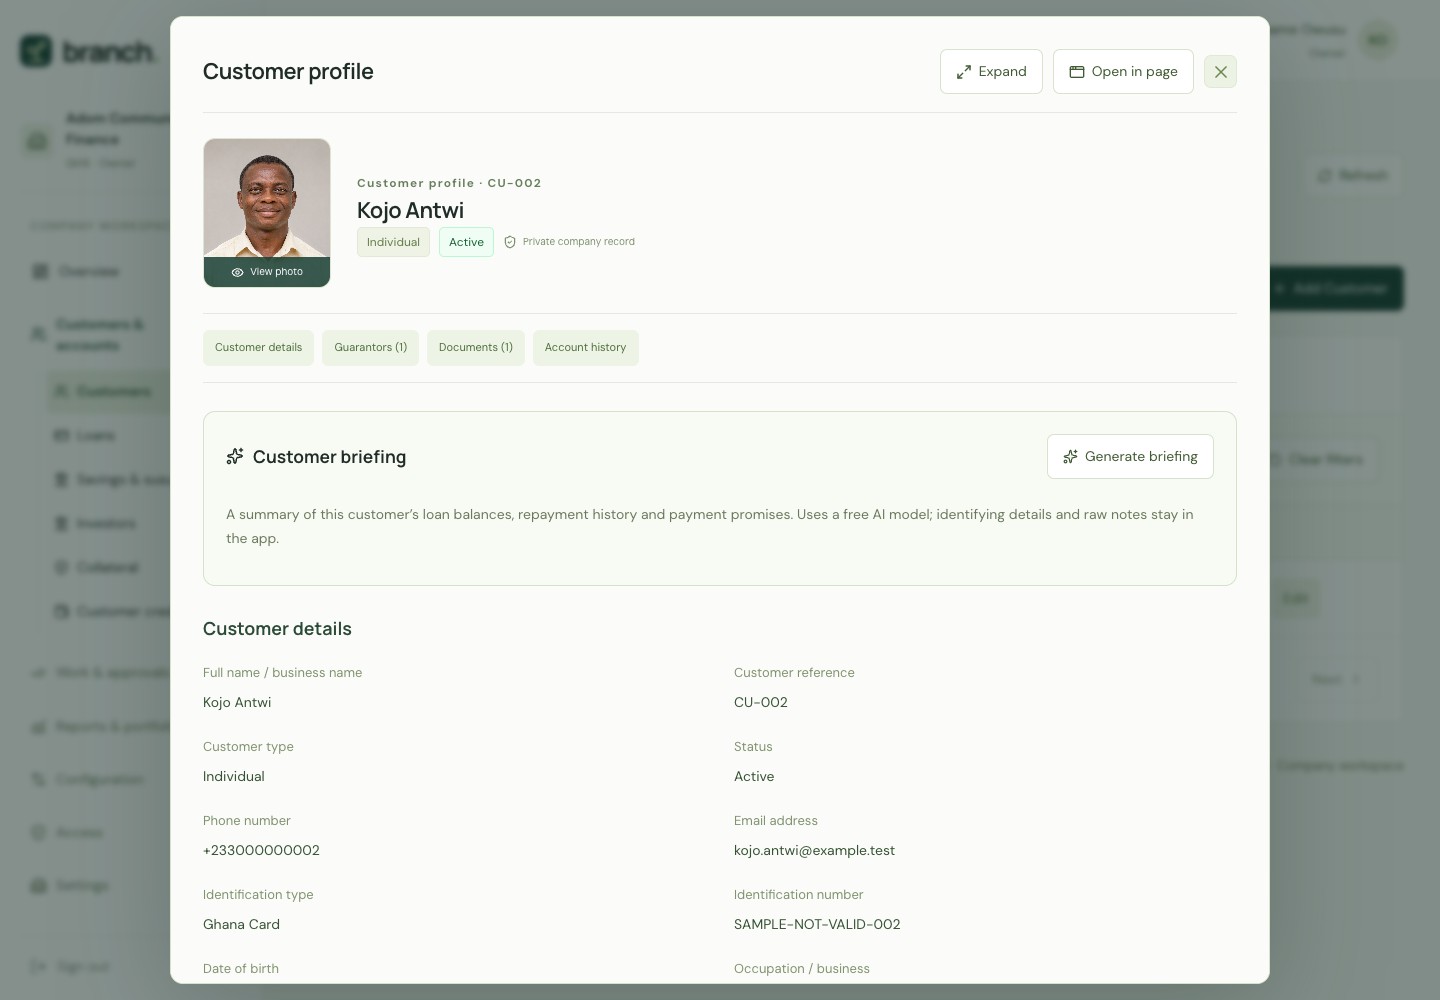 View full-size screenshot
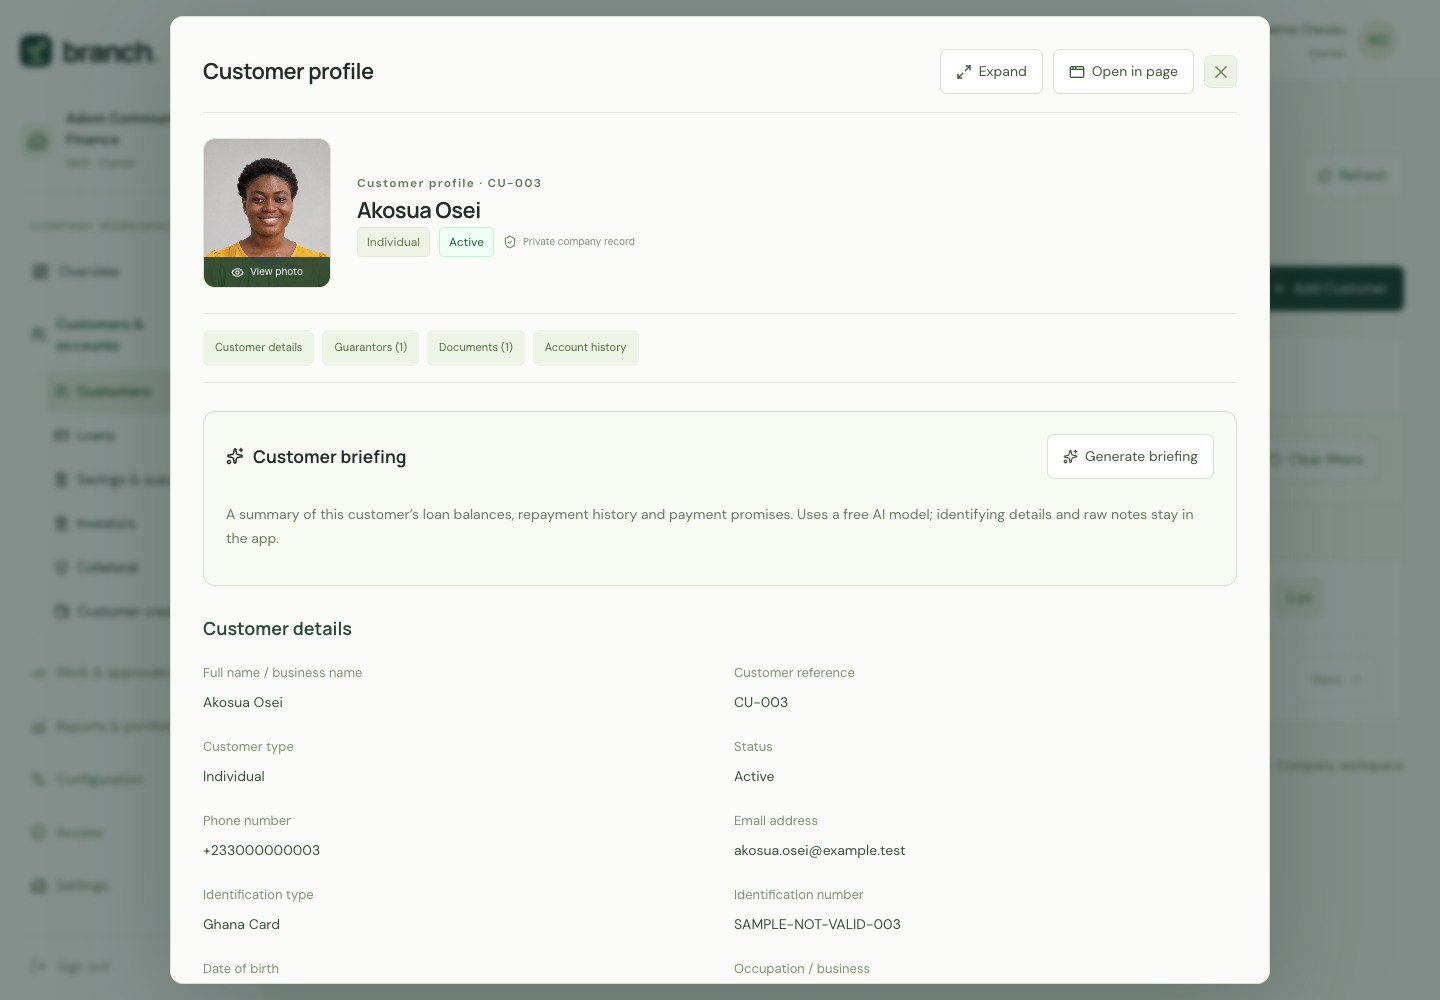 View full-size screenshot
 View full-size screenshot
 View full-size screenshot
 View full-size screenshot
Read a supporting PDF and its review comments
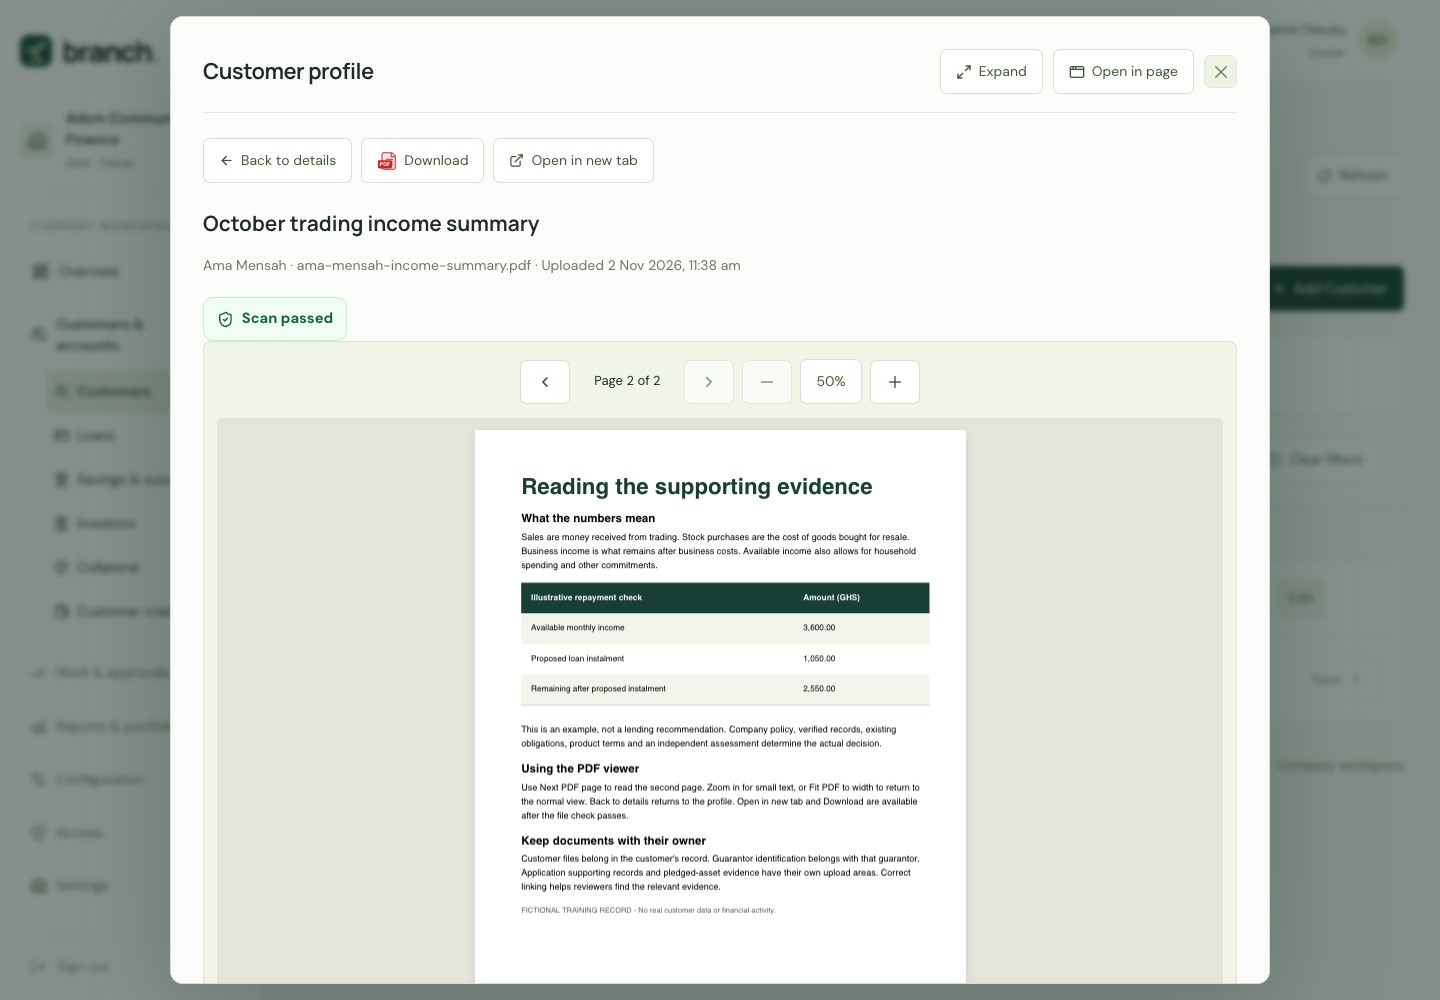
- Open October trading income summary from Ama’s saved documents. Page 1 explains sales, operating costs, household commitments and available income.
- Use Next PDF page to read the second page. It explains the repayment check and what the reviewer should verify; Zoom out fits more of a page on screen.
- Read the comments together with the original evidence. A supporting PDF explains the record; it does not replace independent review or approve a loan.
 View full-size screenshot
 View full-size screenshot
Guarantors, groups and documents
- Use the Guarantors tab to update an existing guarantor and their files. Guarantor documents stay separate from the customer’s own documents.
- Use Groups to create a group and select its customer members. Use Documents to upload and link a file to the correct customer, guarantor or application.
- Wait for the file check to pass before opening or downloading an upload. Use Blocked uploads to investigate rejected files with an authorized administrator.
Customer briefings
- Where your role permits it, generate a briefing from the customer profile and compare it with the source records.
- Review any suggested reminder before using the messaging tools. A briefing does not approve a loan, record a payment or send a message. Availability depends on the company’s AI connection.
Prepare, approve and pay a loan
A loan moves through preparation, independent review and a confirmed payout. Approval alone does not record money paid to the borrower.
- Who
- Loan officer → Independent reviewer → Cashier
- Where
- Loans · Approvals · Cashier
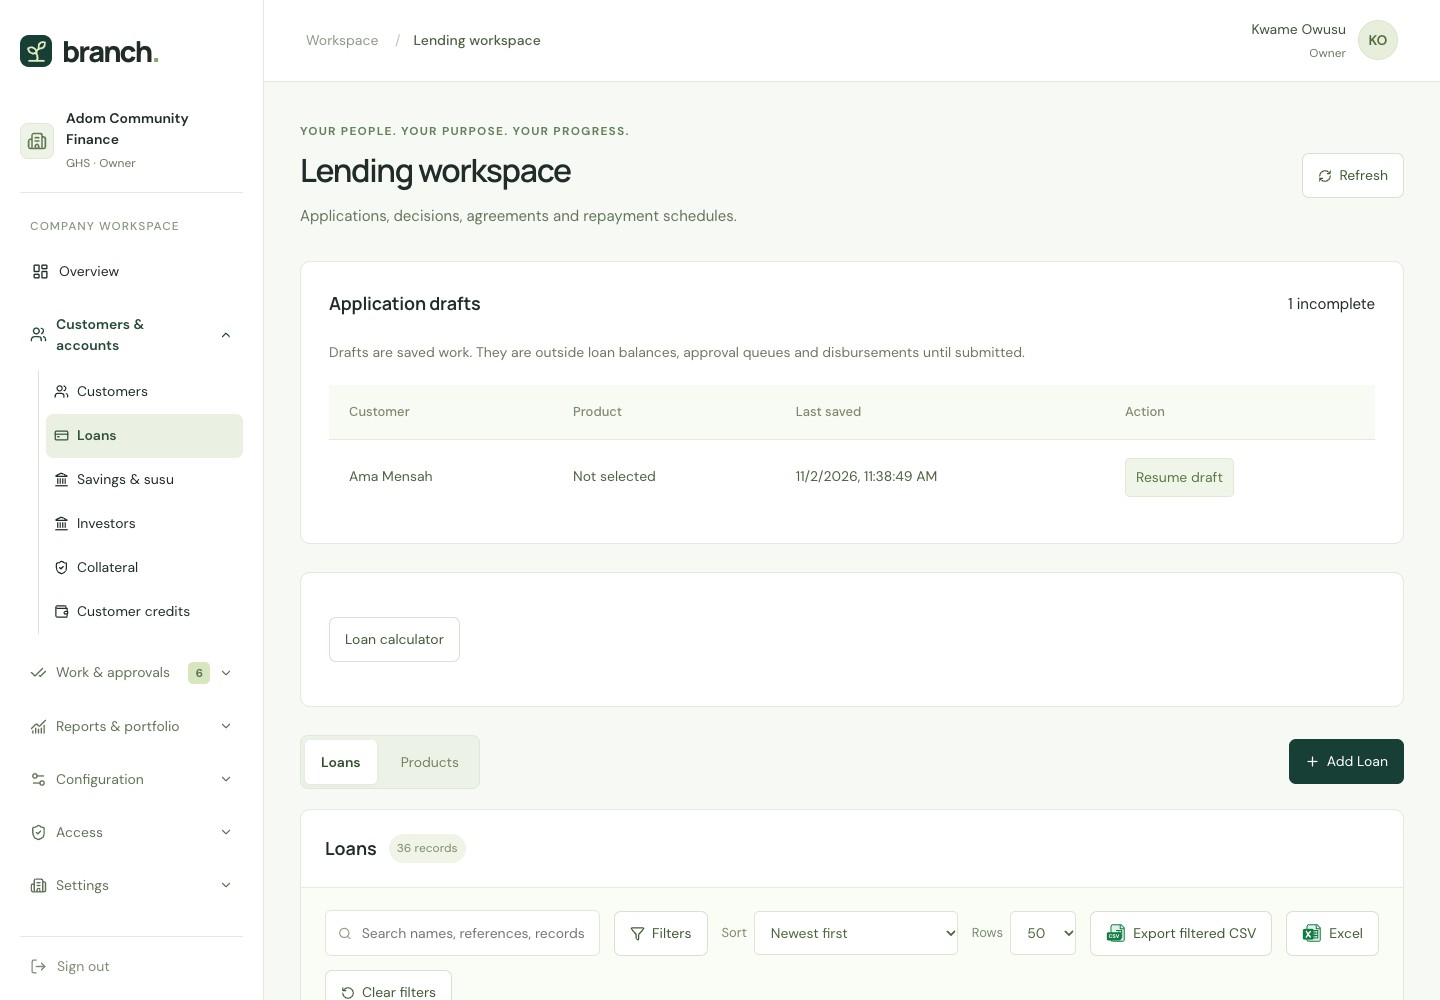
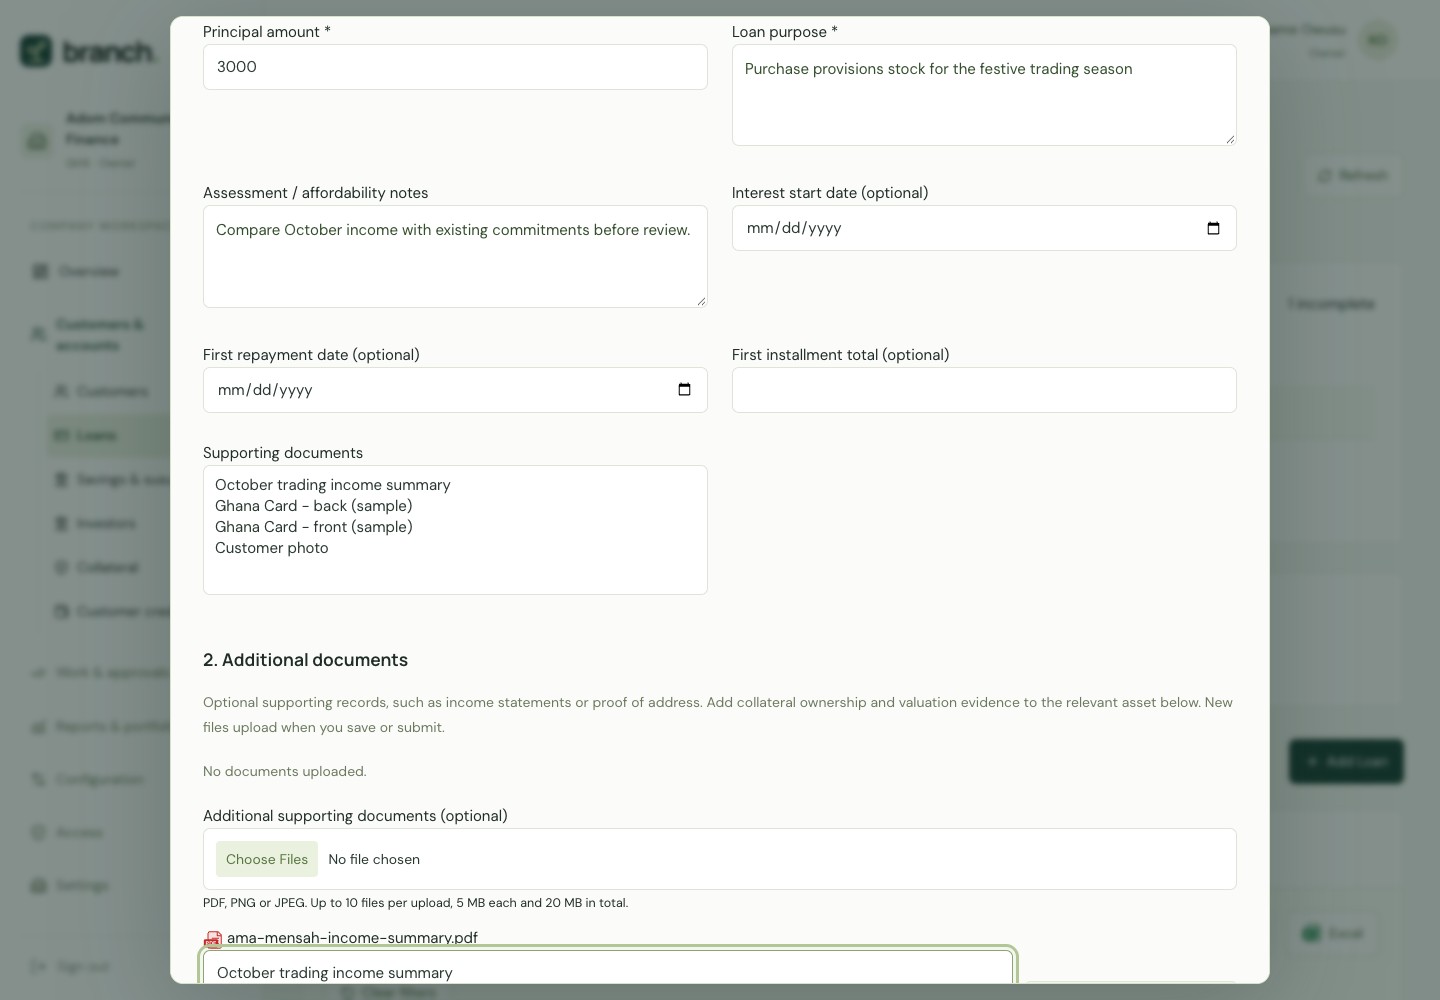
- In Loans, select Add Loan. Choose the customer and product, enter the amount, purpose and assessment, and add supporting documents. Save a draft if you need to finish later; use Resume draft to continue.
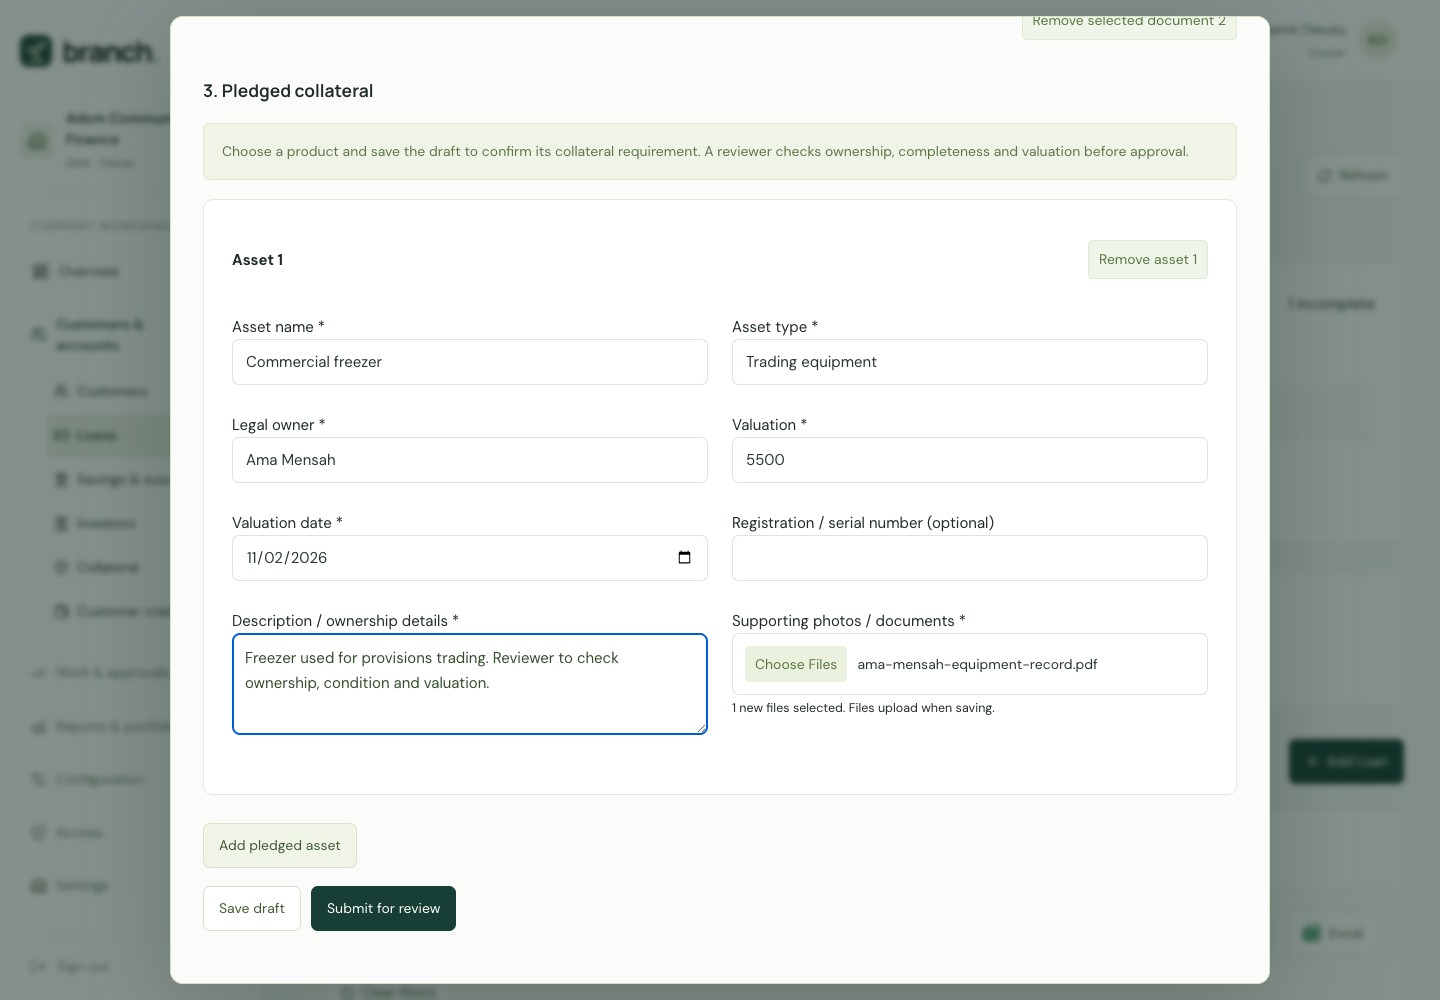
- Complete any pledged asset details and evidence, then select Submit for review. The application enters the approval queue; a saved draft does not.
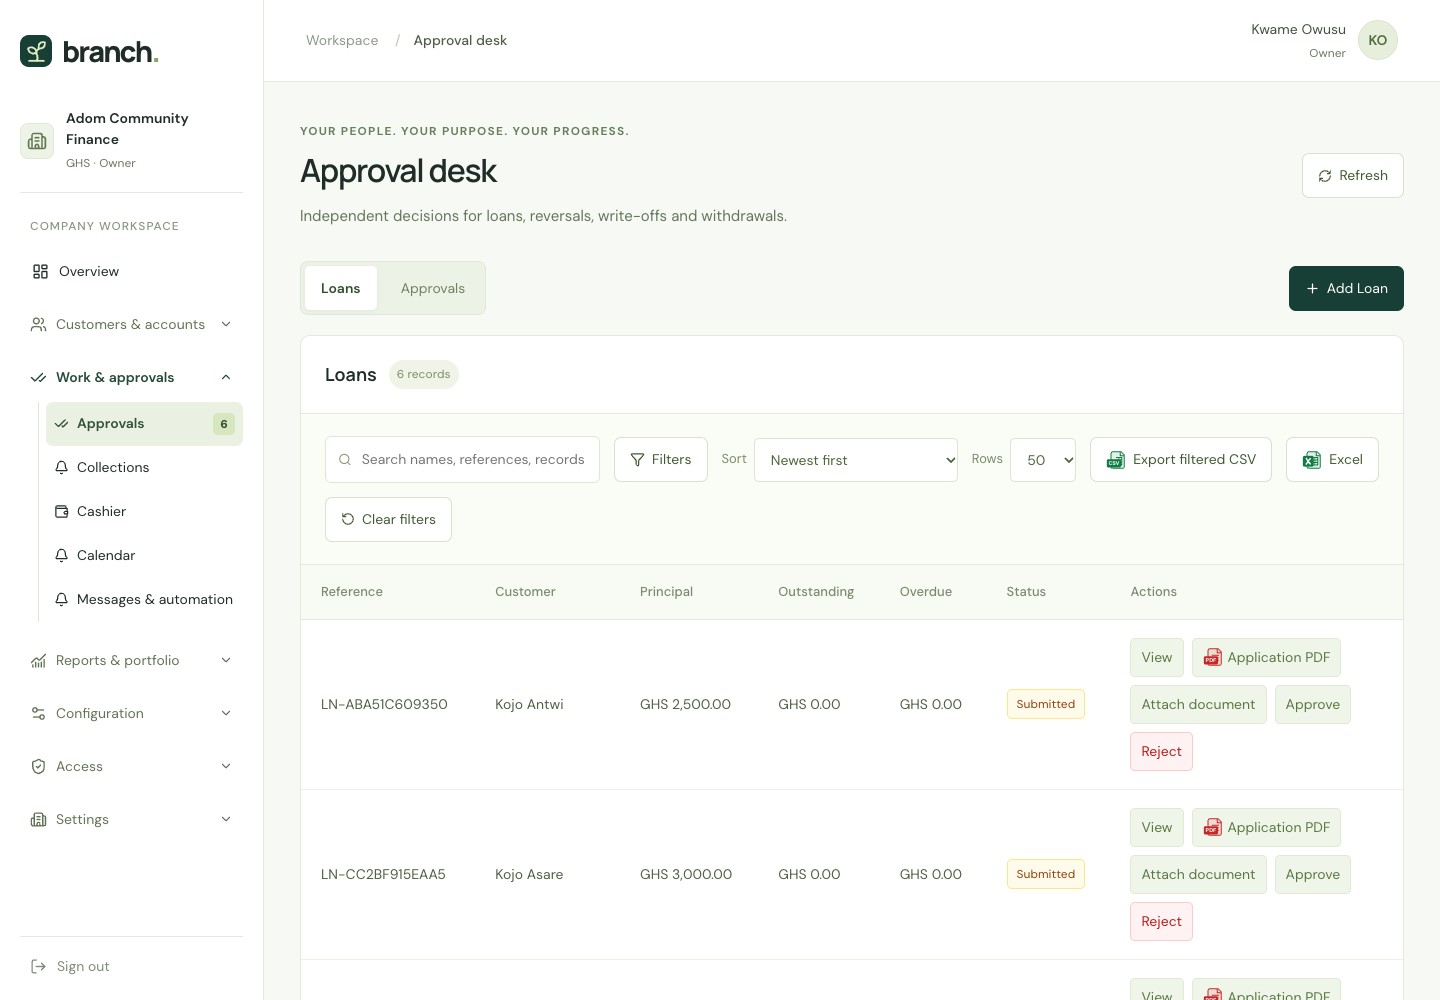
- A different authorized reviewer opens Approvals, selects View and checks the borrower, terms, evidence and repayment schedule. They approve or reject with a decision note. Products with several approval stages need all required reviews.
- After approval, a third authorized staff member uses Disburse in Cashier. Confirm the actual payout first, choose cash, bank or mobile money, and save. Branch records the loan as active and finalizes its repayment dates.
Keep in mindThe preparer and final approver cannot record the disbursement. Product fees are withheld from the payout; check the displayed net amount before paying the customer.
 View full-size screenshot
 View full-size screenshot
 View full-size screenshot
Open the example files
Read the contents alongside the steps. These files contain fictional guide records.
- Read the equipment record (PDF) (opens in a new tab)
An illustrative ownership and valuation record for Ama’s commercial freezer.
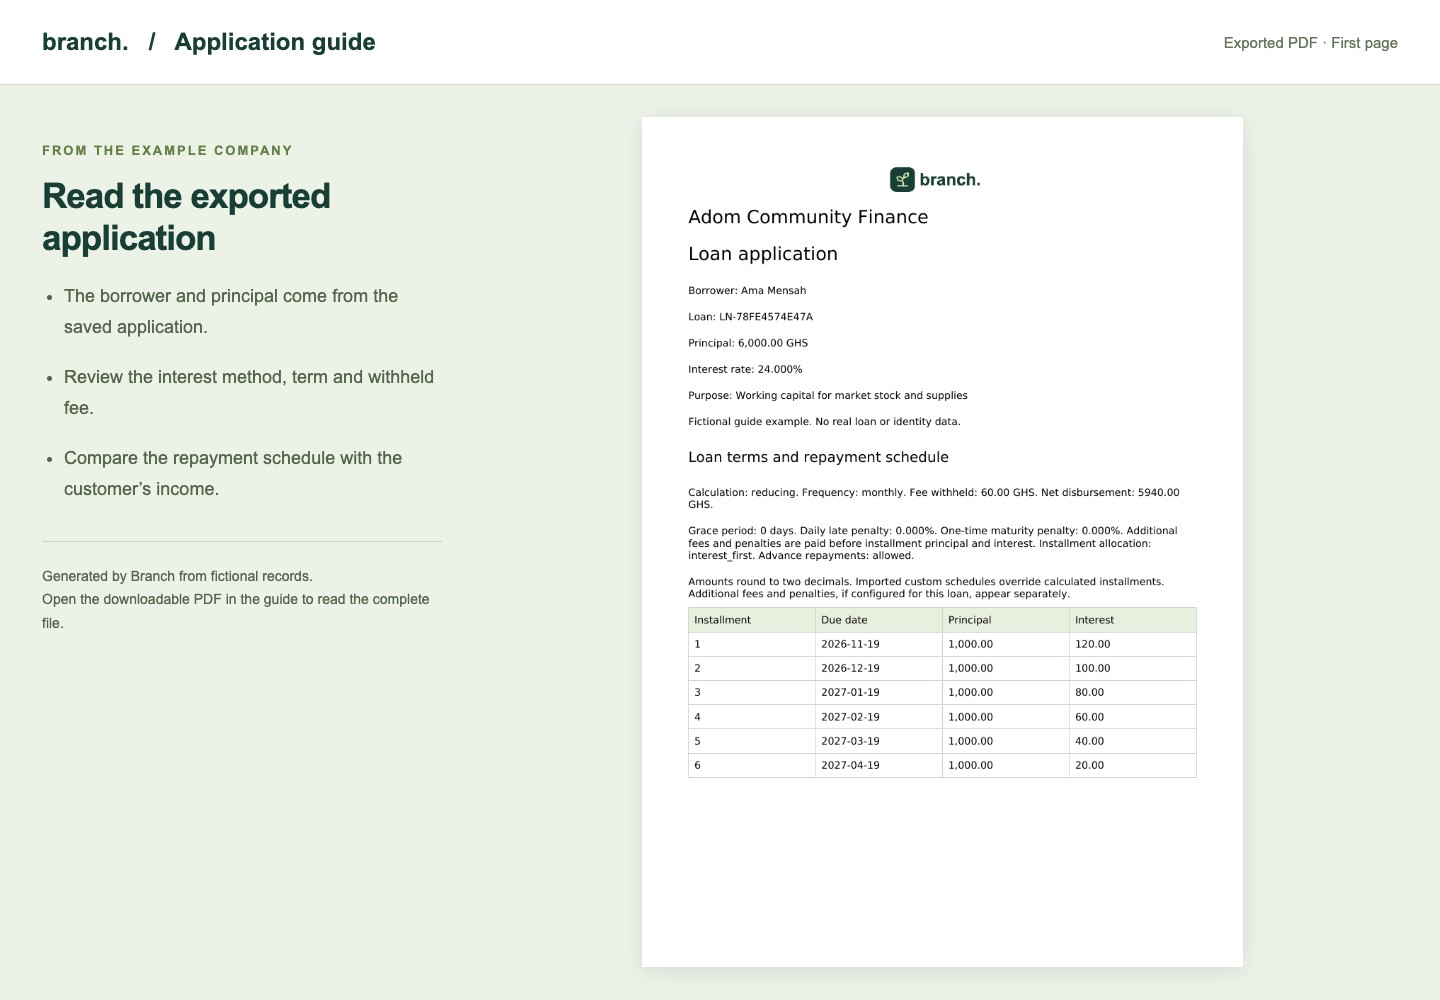
- Open the exported loan application (PDF) (opens in a new tab)
Generated by Branch from Ama’s saved application, with borrower details, terms and schedule.
Supporting documents and form views
- In a loan draft, use Additional supporting documents to select optional PDF, PNG or JPEG files. Review each title. Files upload when you select Save draft or Submit for review; selecting them alone does not upload them.
- Resume the saved draft to continue. You can use Expand or Open in page for more space while keeping your entries and file selections.
- To add files to a submitted or decided loan, open its details and select Add supporting documents. Files added after the decision remain separate supporting records and do not change approved terms or verified collateral.
 View full-size screenshot
Secured loans, collateral and guarantors
- For a product requiring collateral, add each pledged asset, its legal owner, valuation, valuation date and supporting evidence before submitting. Collateral means an asset pledged as security for the loan.
- An authorized reviewer checks ownership and valuation evidence before approval. Use Collateral to track the assets; after approval, use a collateral change request and independent review to update the approved security.
- Use Lending rules → Loan Guarantees to associate the relevant guarantor or customer with a loan. Company guarantor and document requirements must be satisfied before approval.
 View full-size screenshot
Product terms, loan changes and write-offs
- Use Loans → Products to configure interest, payment frequency, term, amount limits, fees and collateral requirements. Lending rules adds approval stages and penalty settings. Use the loan calculator to compare a proposed schedule before applying.
- To change an active loan, open its details and request the appropriate loan change with a reason. Restructuring, extensions, repricing and permitted settlement discounts require independent review; editing the product does not change an existing loan’s agreed terms.
- If recovery is no longer expected, an authorized member can request a write-off with a reason. A different reviewer decides the request; the loan history remains available.
Receive payments and issue receipts
Record a manual payment only after the money has been received. Each posted payment has a reference and a numbered receipt.
- Who
- Cashier · Authorized reviewers
- Where
- Work & approvals → Cashier
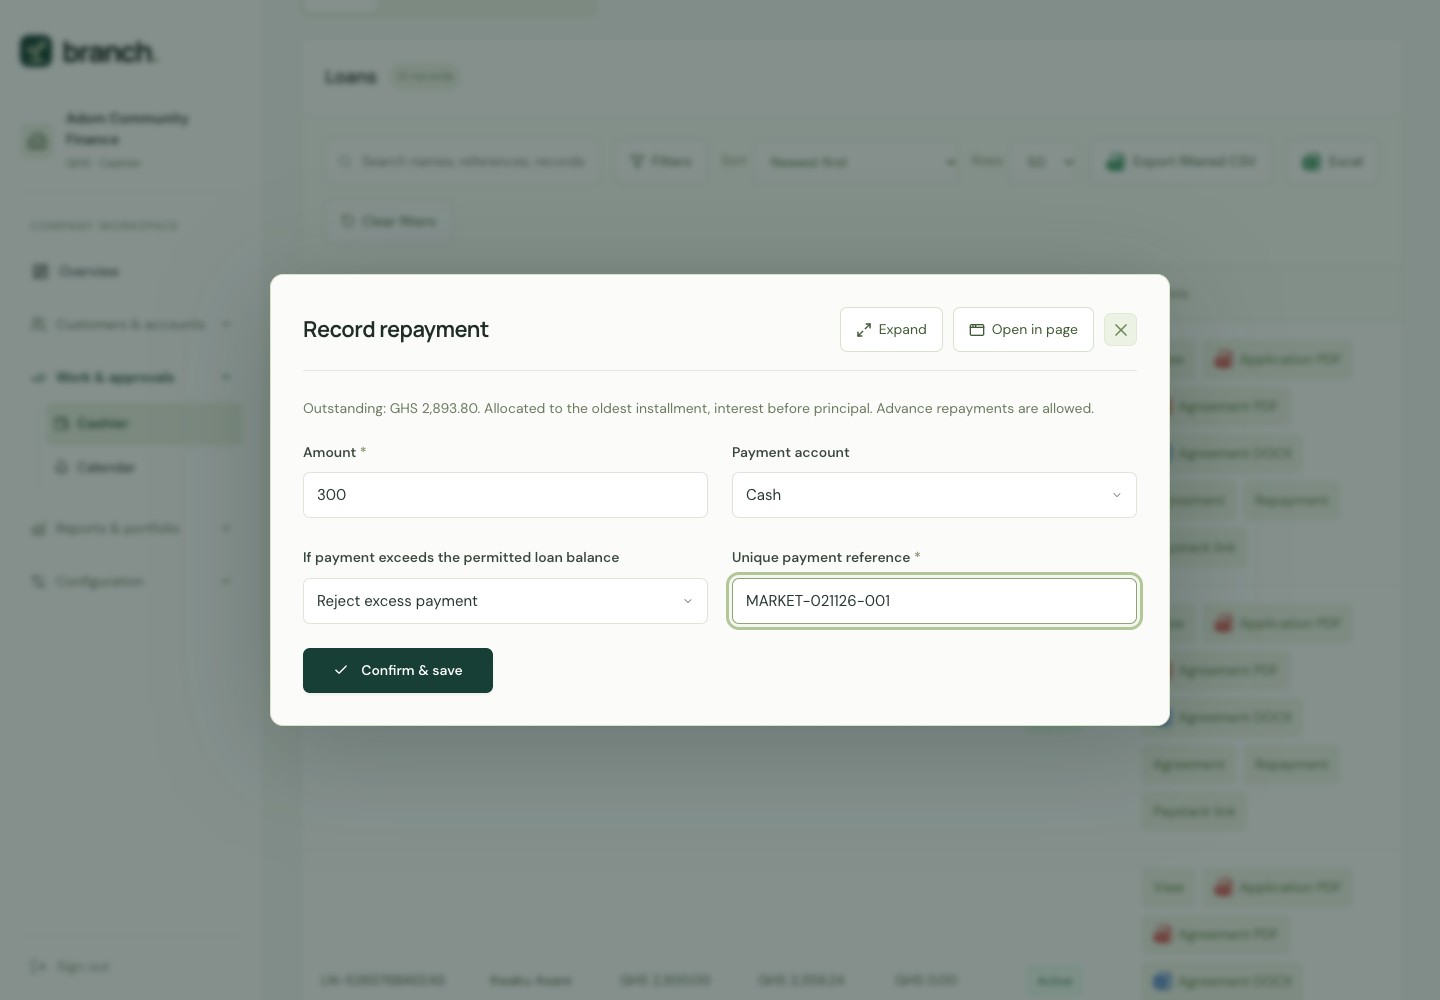
- Find the active loan in Cashier and select Repayment. Enter the amount received, payment account and a unique payment reference.
- Check the customer, amount and reference, then confirm. If the product requires repayment review, a different authorized reviewer must approve the pending request in Lending rules → Financial Requests before it changes the balance.
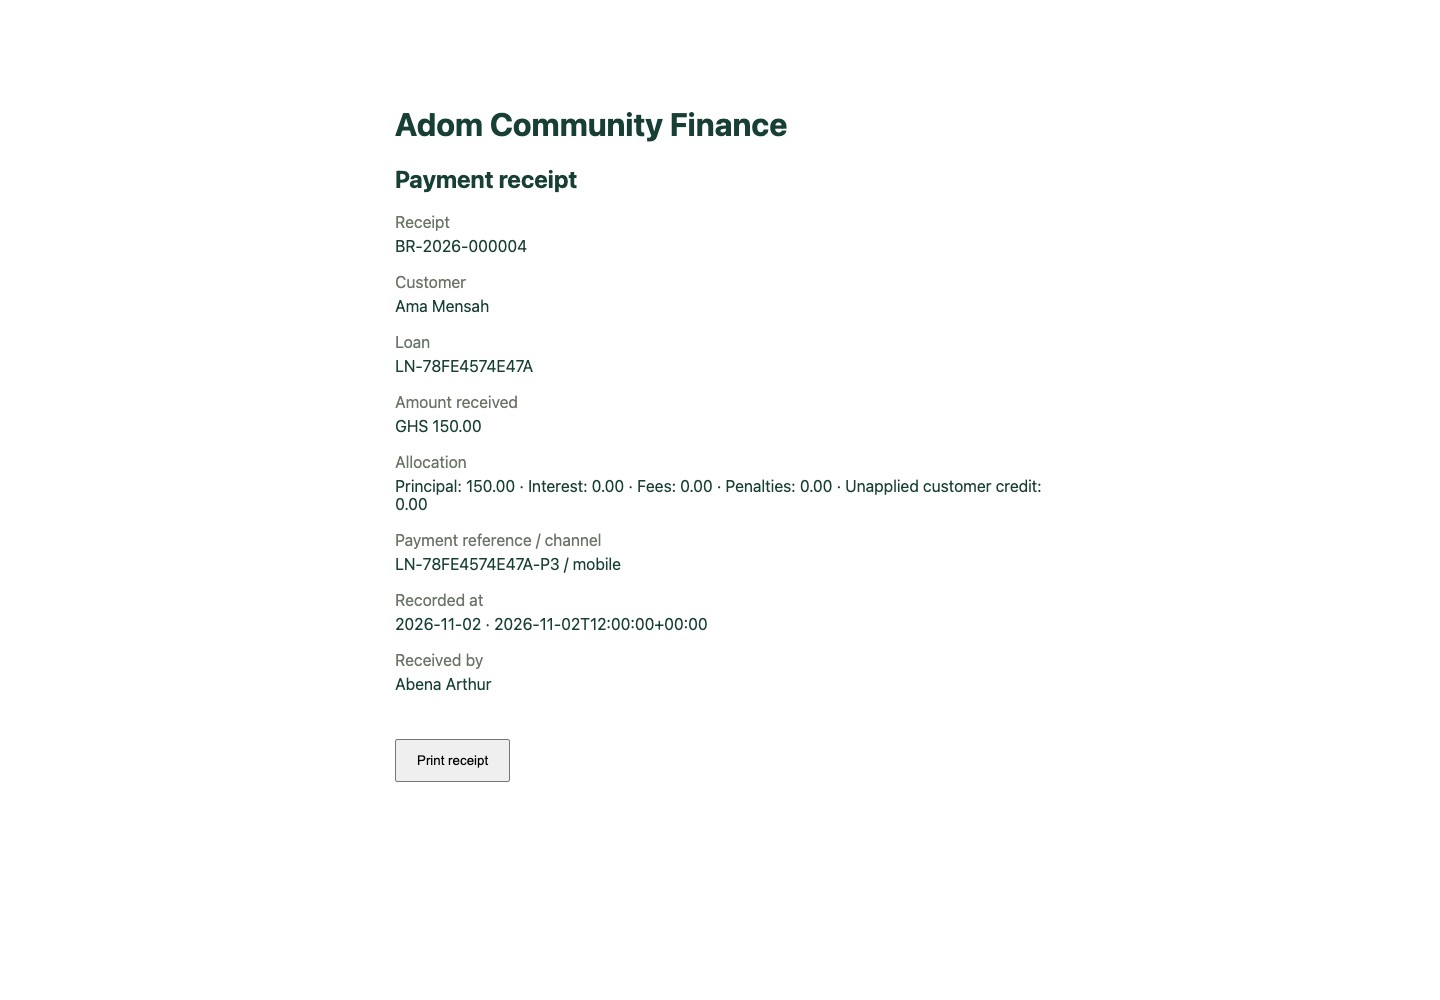
- Once posted, the payment reduces the loan according to its agreed rules; partial payments are supported. Open Repayments and select Receipt to view or print the record. Check the remaining balance in the loan or customer profile; a fully repaid loan closes automatically.
Keep in mindIf an amount exceeds the permitted balance, explicitly select Hold excess as customer credit when appropriate. Reusing an identical payment reference returns the existing payment; a conflicting reference is rejected.
 View full-size screenshot
 View full-size screenshot
Open the example files
Read the contents alongside the steps. These files contain fictional guide records.
- Open the example payment receipt (PDF) (opens in a new tab)
Printed from Branch’s posted receipt view, with the borrower, amount, allocation and unique reference.
Correct a manual payment
- In Repayments, select Reverse on the original manual payment and explain the correction. A different authorized reviewer decides it in Approvals.
- An approved reversal restores the original payment allocations and retains the original receipt. Record any replacement payment with its own reference. Paystack payments require provider-confirmed refund handling and cannot use this manual reversal.
Apply or refund excess customer credit
- Open Customer credits and check the customer’s held balance. Request an application to an eligible loan or savings account, or a refund, with the required details.
- A different authorized reviewer checks the request and any confirmed refund payout before approving it. Credit movements retain the history; corrections also require review.
Collect online through Paystack
- With the company’s Paystack collection connection configured, select Paystack link on an active loan or savings account. Enter the amount and share the generated checkout link.
- The customer pays on Paystack. Wait for server verification; returning from checkout alone does not confirm a payment. Check Recent Paystack payments and use Verify payment if needed.
- If a verified payment needs review, resolve the account issue and use Retry allocation. Refunds and outgoing bank payments need separate confirmed provider handling.
Follow up payments that are due
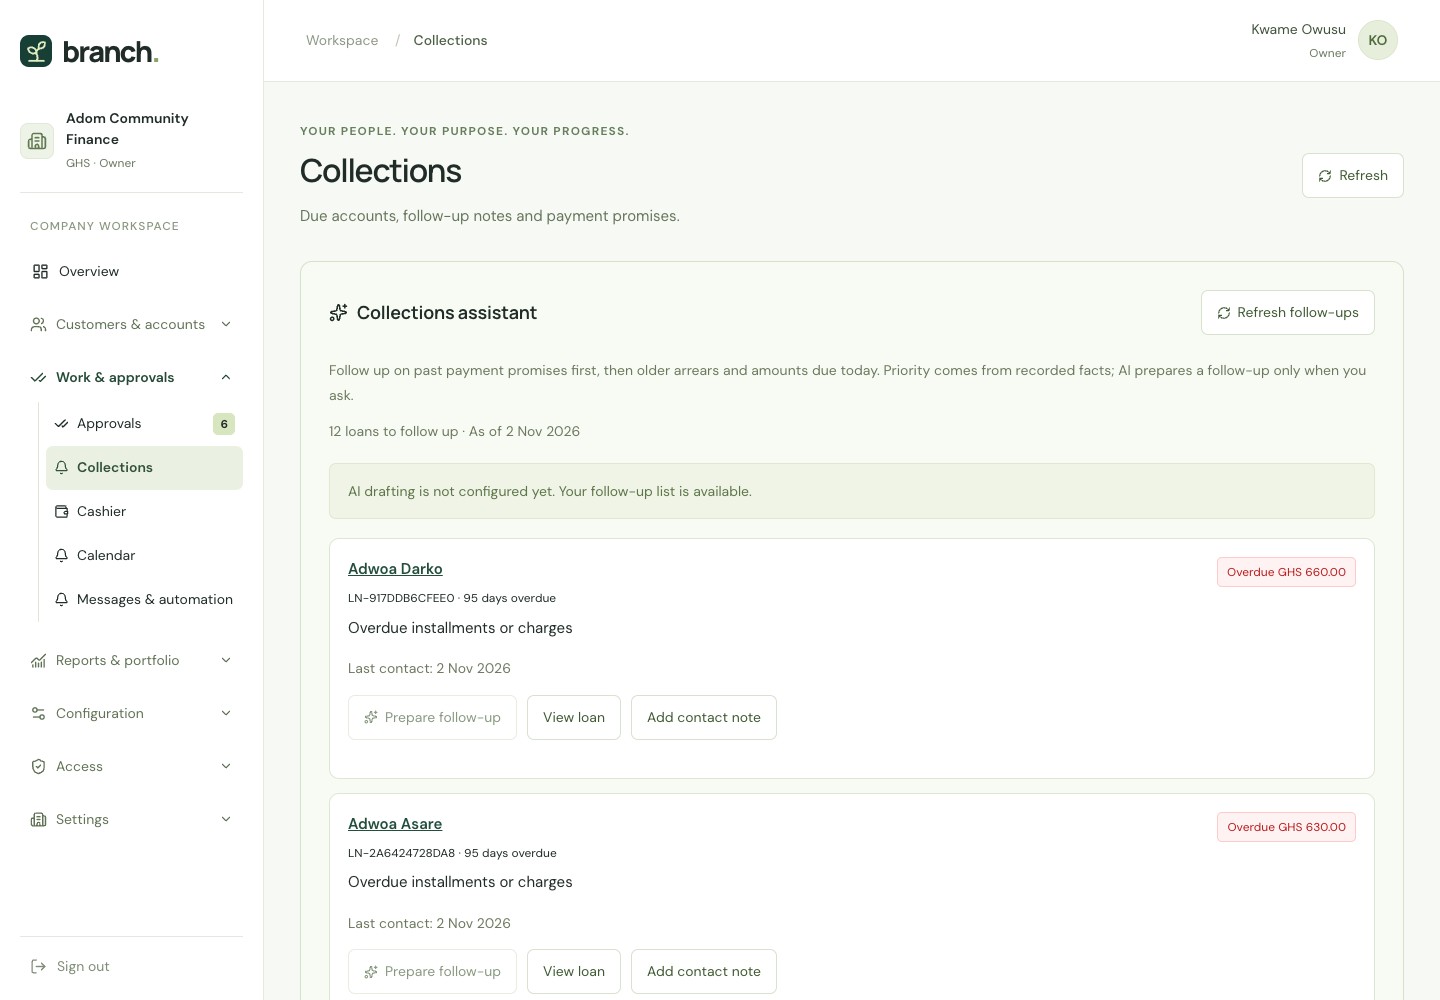
Collections helps staff see accounts due today or overdue and keep a record of follow-up conversations.
- Who
- Loan officer · Manager · Authorized staff
- Where
- Work & approvals → Collections
- Open Collections and review the due accounts and follow-up queue within your branch or assigned customers.
- Open the loan to check unpaid installments. Contact the customer and record a contact note; include a promised payment date and amount when agreed.
- Use Reminder for an email or SMS where delivery is configured. Review suggested drafts and source facts before sending through the messaging workflow.
- Return to the queue to follow payment promises. Record any money received through Cashier so the balances and follow-up information update.
 View full-size screenshot
Coordinate visits and appointments
- Open Calendar to add an event with start and end times, the branch, responsible staff member and notes.
- Use the calendar alongside collection promises to coordinate work. Creating an event does not send a payment or make a financial posting.
Manage savings and susu
Once savings is enabled, open customer accounts, record deposits and review withdrawals separately.
- Who
- Cashier · Independent reviewer · Owner / administrator
- Where
- Customers & accounts → Savings & susu
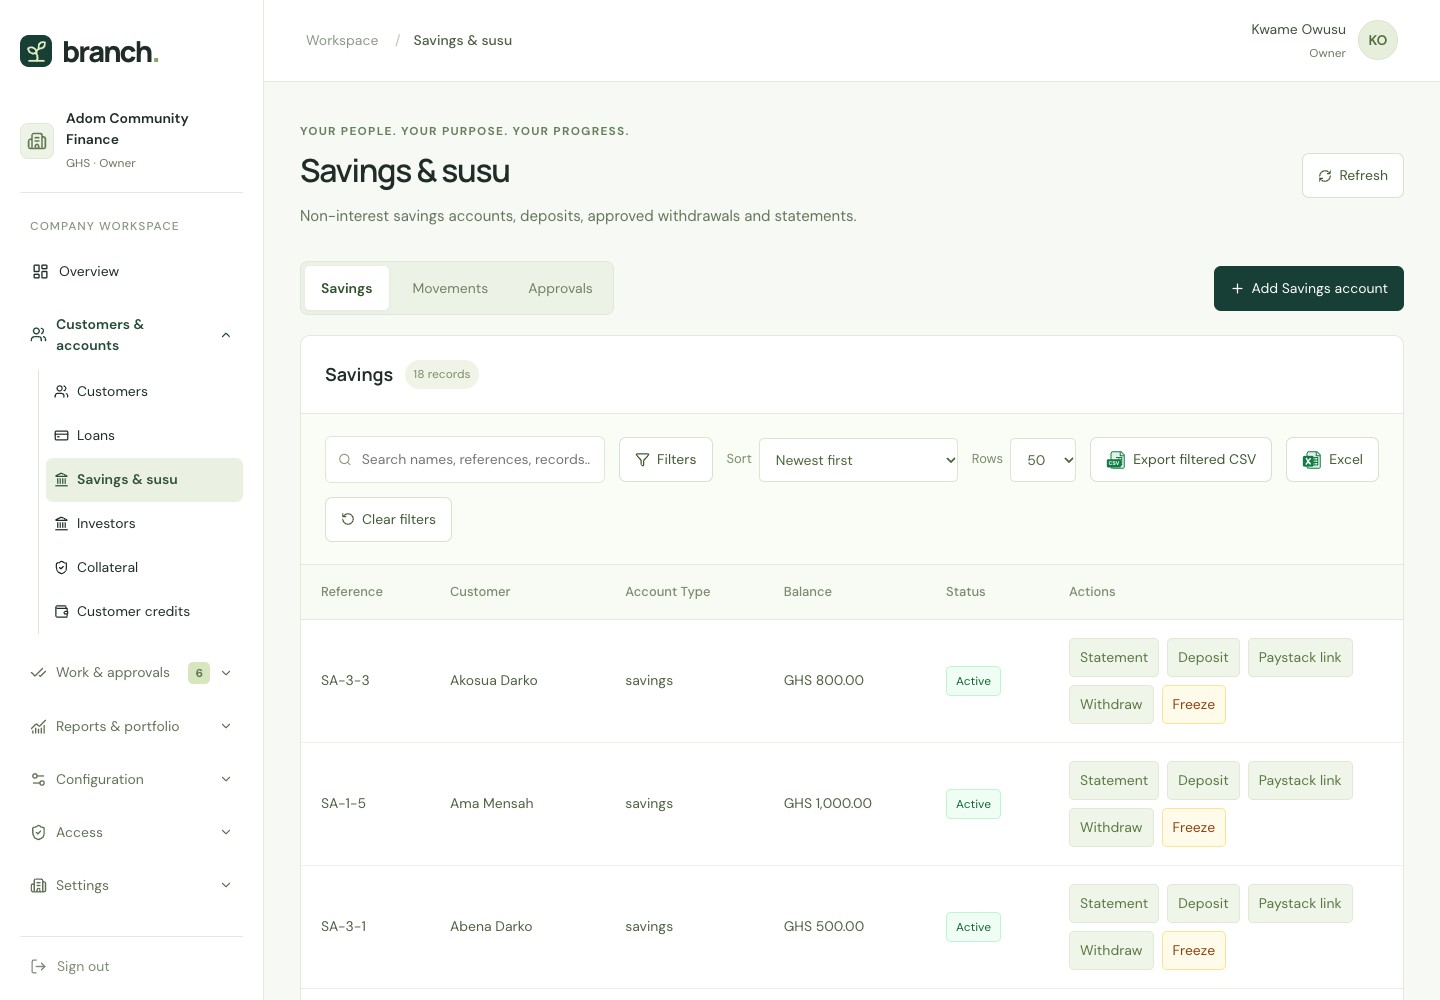
- In Savings & susu, add an account for the customer and choose savings or susu. Where required, link its pricing product under Deposit products → Savings Terms.
- Select Deposit after receiving the funds. Enter the amount, payment account and unique reference, then save or complete any required review. Open the account statement or receipt to check the recorded movement.
- For a payout, select Withdraw and submit the amount, payment account and reason. A different authorized reviewer decides it in Approvals and confirms the payout. Approval records the withdrawal immediately.
- Review the account statement and balance. An authorized manager can use Freeze when transactions must be stopped, and Unfreeze when the account may operate again.
Keep in mindInsufficient funds, frozen accounts, minimum balances and reserved amounts can prevent withdrawals. Do not approve a withdrawal as a promise of a later payment.
 View full-size screenshot
 View full-size screenshot
Open the example files
Read the contents alongside the steps. These files contain fictional guide records.
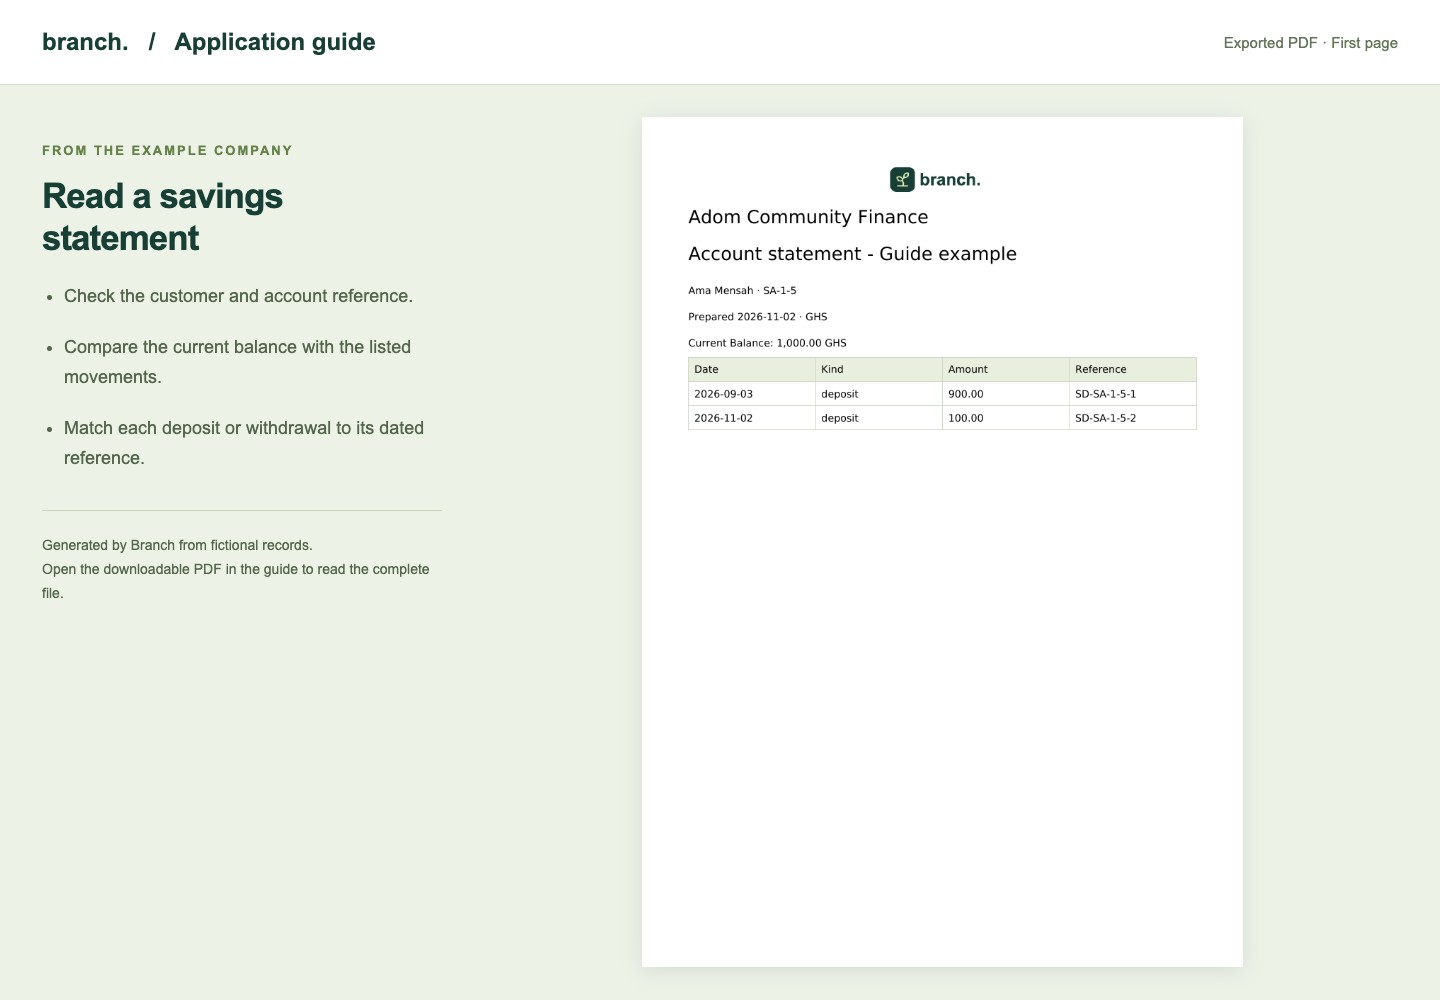
- Open the exported savings statement (PDF) (opens in a new tab)
Generated from Ama’s account: current balance, movement dates, amounts and references.
Interest, reserved funds and closure
- Owners configure interest, fees and minimum balances in Deposit products. Use Savings Terms to set or release a lien, meaning an amount reserved against withdrawal, or post completed-period interest.
- Before closure, post all completed funded interest and fee periods and release reserved funds. Request final withdrawal & close for a remaining balance; a different reviewer confirms the payout. Use Close empty savings account only when its balance and other closure requirements allow it.
Manage investors and loan funding
Investor records connect the person providing funds with their accounts, movements and loan funding reservations.
- Who
- Owner · Administrator · Accountant
- Where
- Customers & accounts → Investors
- Add the investor’s profile. Create an investor product in Deposit Products with the agreed interest, fees and minimum balance.
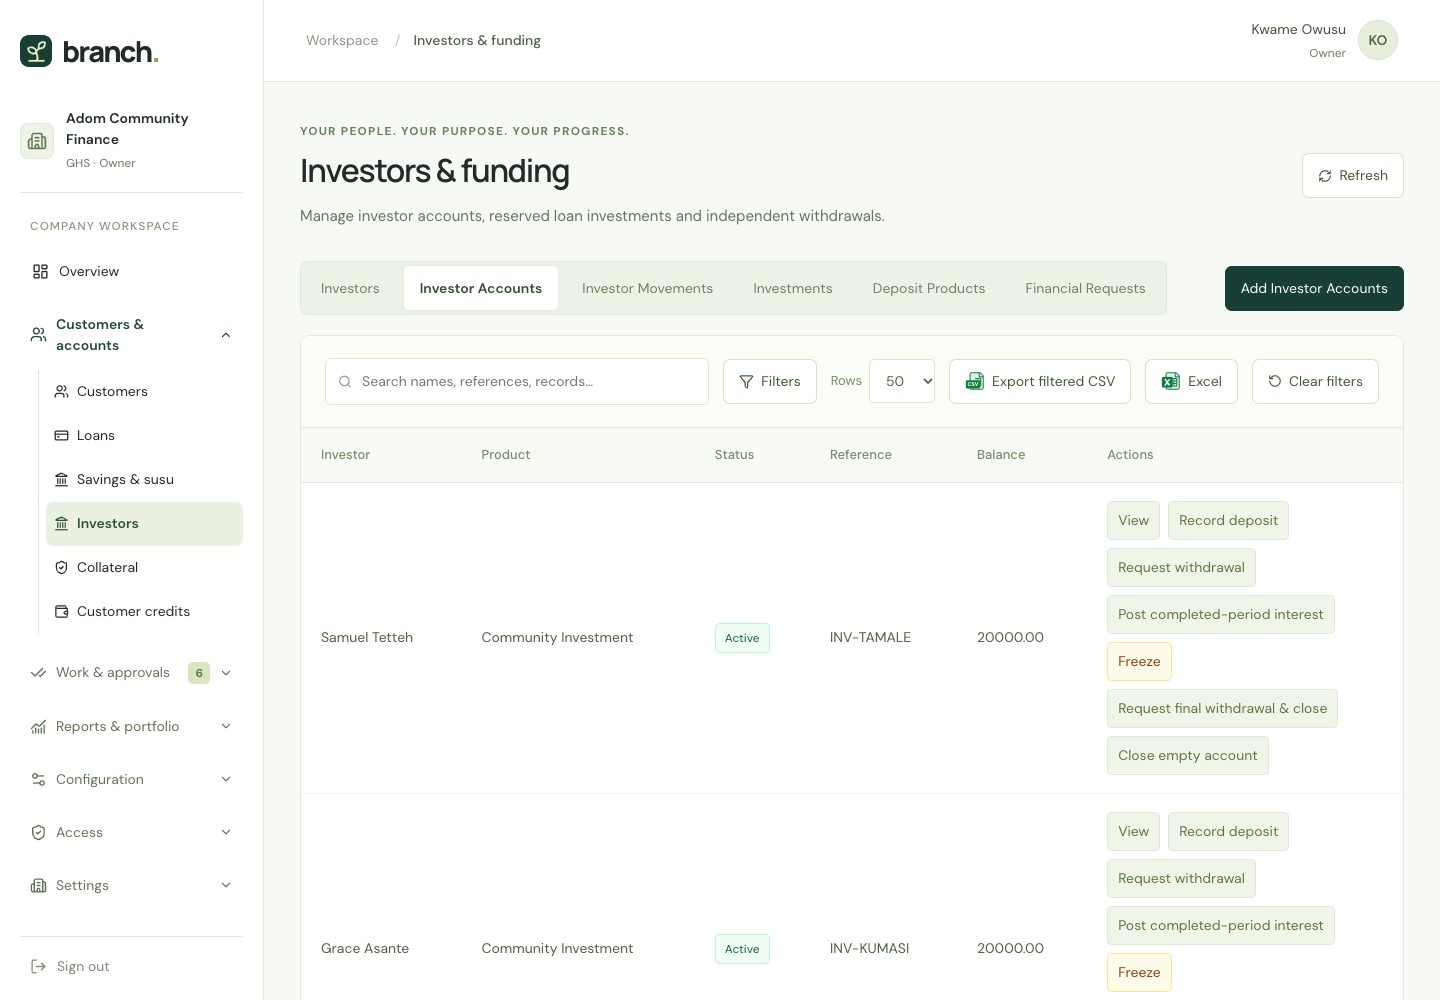
- In Investor Accounts, add an account linked to the investor and product. Use Record deposit after funds are received; products requiring review leave the deposit pending until independently approved.
- Use Investments to reserve eligible investor funds against a loan. Release a reservation when it is no longer needed; a reservation is not a new customer payout.
- Request withdrawals from the account. A different authorized reviewer opens Financial Requests, checks the funds and confirms the payout before approving. Review Investor Movements and statements afterward.
 View full-size screenshot
Interest, freezing and closing investor accounts
- Post completed-period interest from the account action, and inspect the resulting movements. Use Freeze or Activate to control transactions.
- Release funding reservations and complete required interest and fee postings before requesting a final withdrawal and closure. A different reviewer confirms the payout; an eligible empty account can be closed directly.
- Use Portal access to invite the investor to view their own accounts and statements.
Record funds, match statements and close the day
Accounting records where money came from and where it went. Loan, savings and payment actions create their own linked entries.
- Who
- Owner · Administrator · Accountant · Cashier for daily closing
- Where
- Reports & portfolio → Accounting · Work & approvals → Cashier
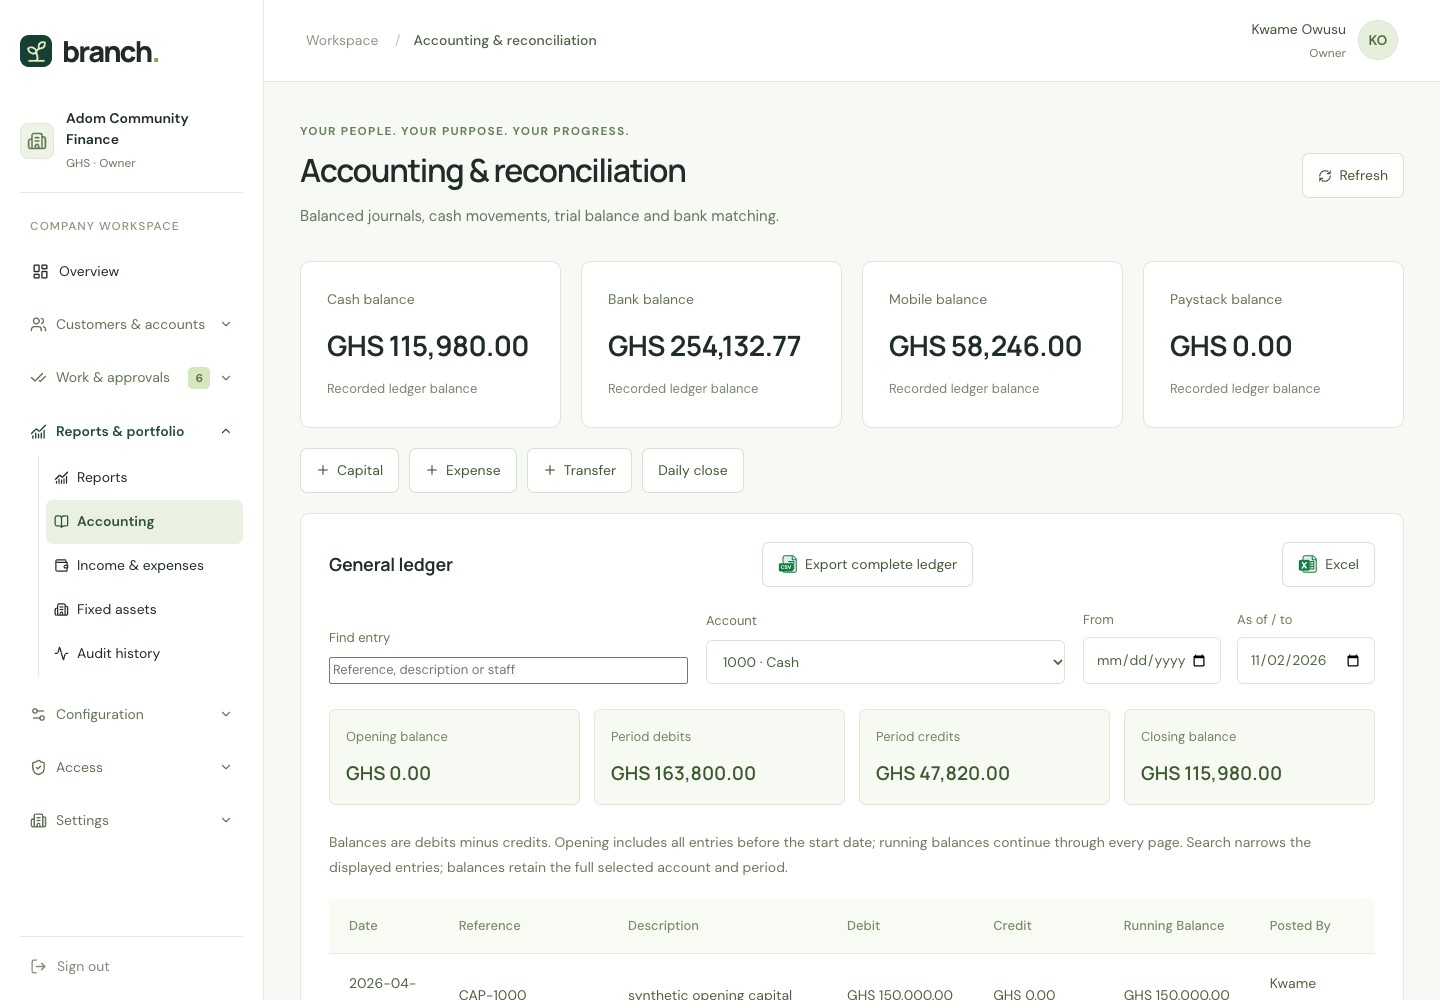
- Use Capital, Expense or Transfer in Accounting for the appropriate confirmed movement. Choose the amount and payment account, add a clear description and save.
- Review the account ledger to follow entries and running balances. For a bank or mobile-money journal, select Reconcile and match the exact statement amount and reference.
- Finish the day’s transactions before selecting Daily close in Accounting or Cashier. Choose the payment account, enter the counted or verified closing balance and explain any difference.
- Check the closing record. Closing locks that payment account against further manual same-day postings. A difference is recorded without automatically changing the balance; verified online collections can still be recorded.
 View full-size screenshot
Income, expenses and recurring entries
- Open Income & expenses, add the category, description, amount, payment account and any related loan. Add supporting files through the record details.
- For a recurring entry, set its recurrence and next due date. When it is due, confirm the actual payment through its request and independent review. A recurring schedule does not prove that a bank payment happened.
Fixed assets and depreciation
- Open Fixed assets and record the purchase, cost, acquisition date, expected useful life and remaining value. Confirm acquisition from the chosen payment account.
- Post depreciation as permitted, or enable the scheduled process. Depreciation spreads the asset’s cost over its useful life, starting in the month after acquisition. Record a confirmed disposal when the asset is sold or retired.
Review reports and the activity history
Reports explain portfolio activity; the audit history records who made important changes and decisions.
- Who
- Owners · Managers · Accountants · Auditors · Other roles within their access
- Where
- Reports & portfolio → Reports · Audit history
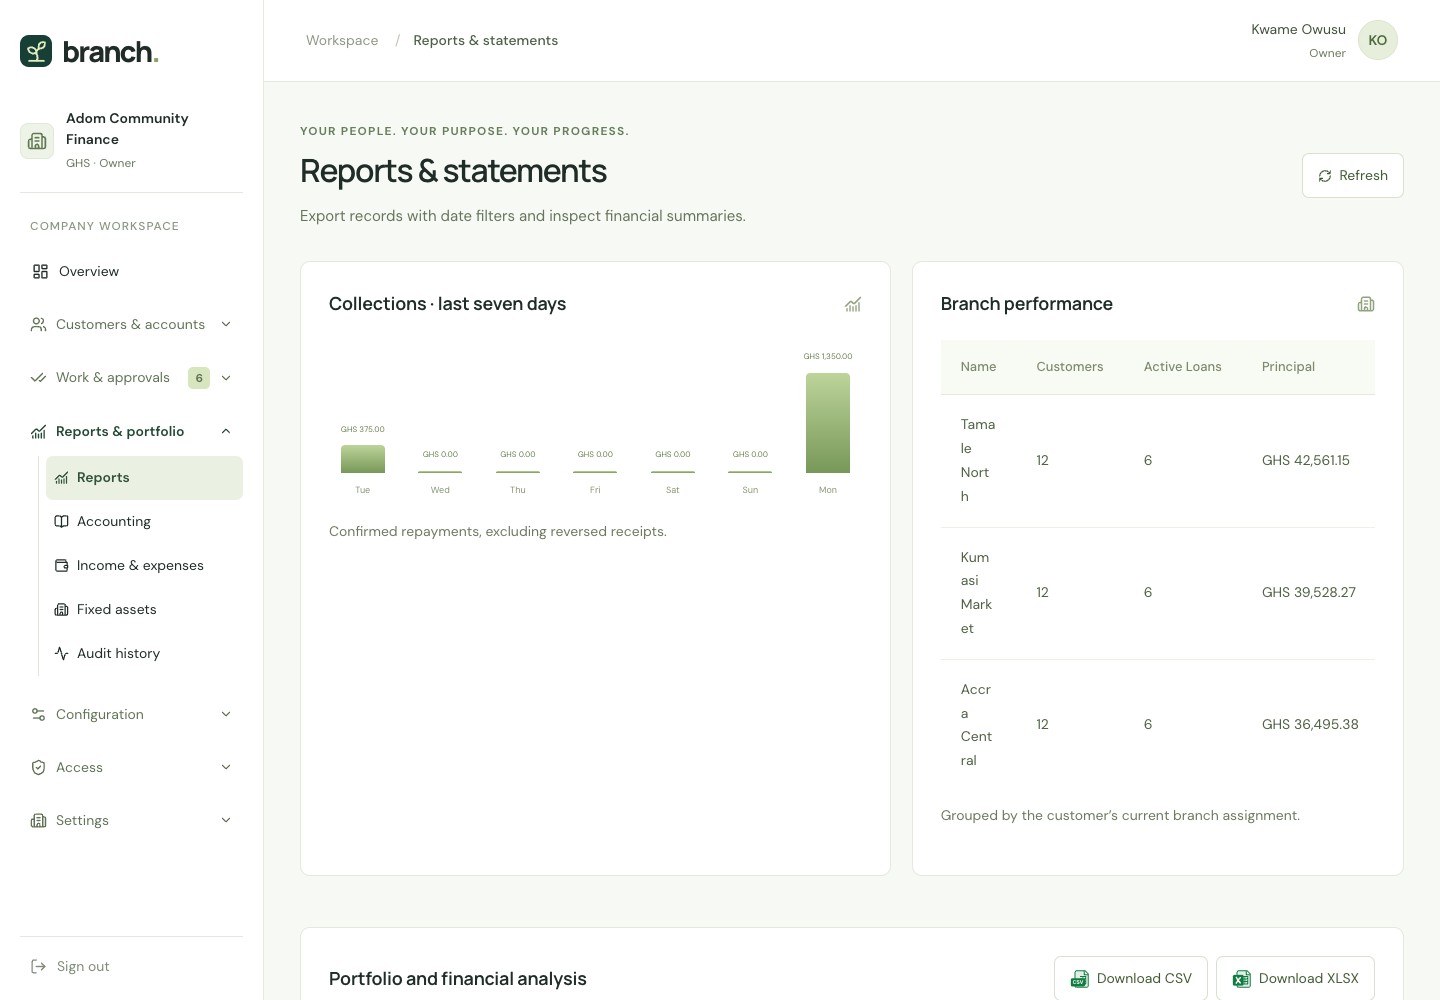
- Open Reports and choose the operating, analysis or financial report you need. Set the dates and any available branch or officer filters.
- Review disbursements, collections, repayment performance and aged arrears. Aged arrears groups unpaid amounts by how long they are overdue; portfolio at risk measures outstanding principal on overdue loans.
- Review the ledger, trial balance, income statement or balance sheet for the selected dates. Use available CSV or Excel exports, or PDF statements, to share the required report.
- Open Audit history to inspect the actor, action and recorded changes. Compare the related approval, payment or customer record when investigating an entry.
Keep in mindRead the date explanation on each report. Payments, reversals, actual payouts and record creation can fall on different dates. Exports include all matching records, not just the visible table page.
 View full-size screenshot
 View full-size screenshot
 View full-size screenshot
Open the example files
Read the contents alongside the steps. These files contain fictional guide records.
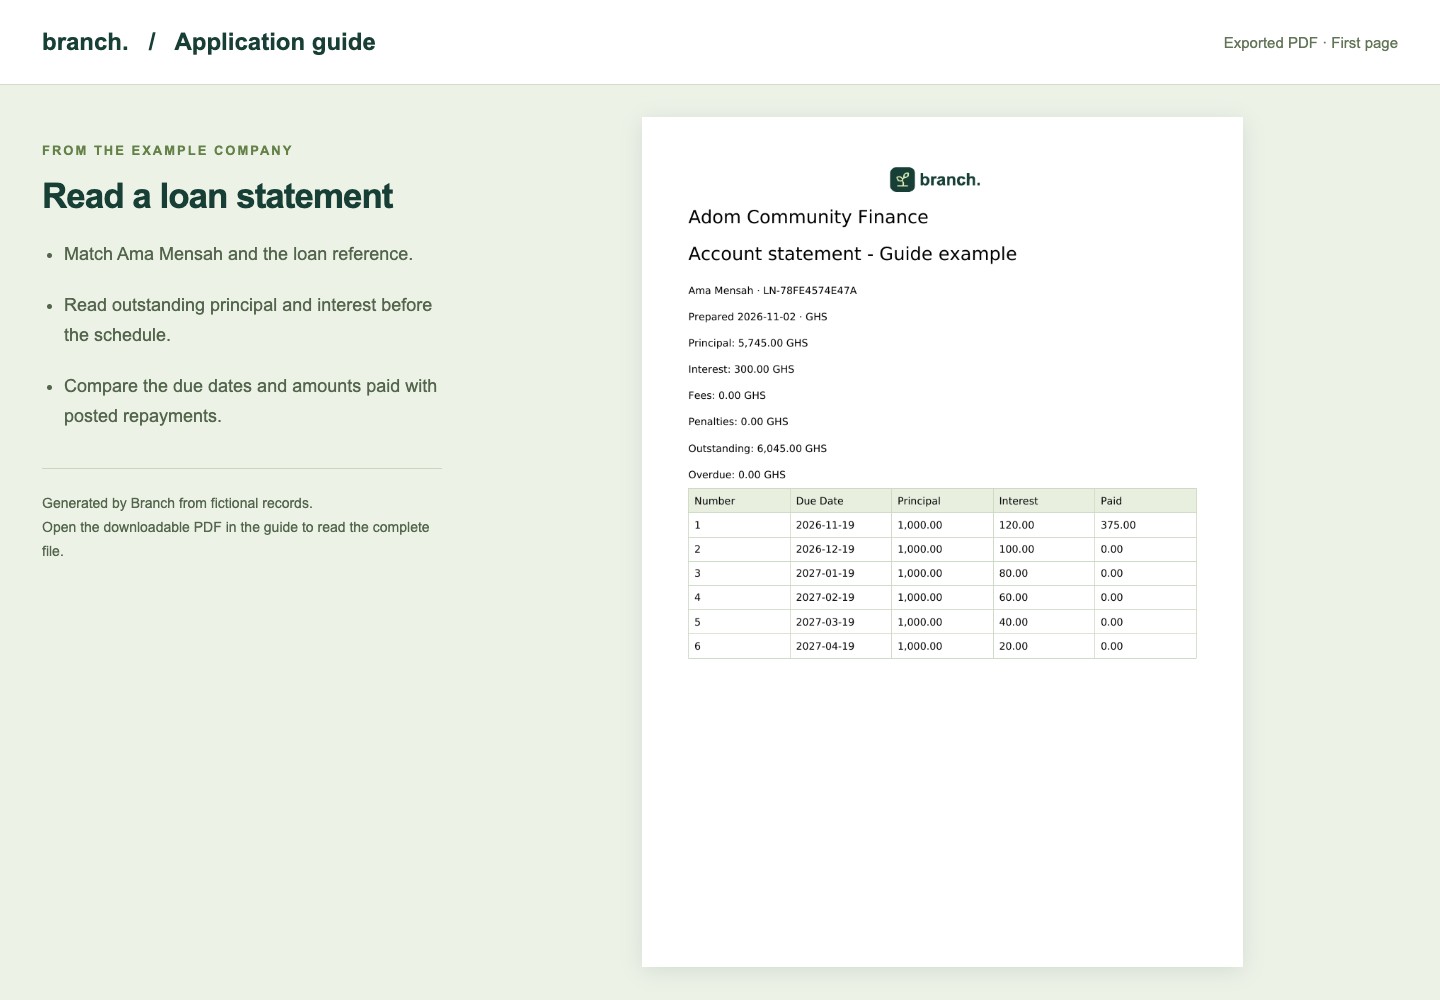
- Open the exported loan statement (PDF) (opens in a new tab)
Read scheduled amounts, payments and outstanding totals from Ama’s actual fictional loan record.
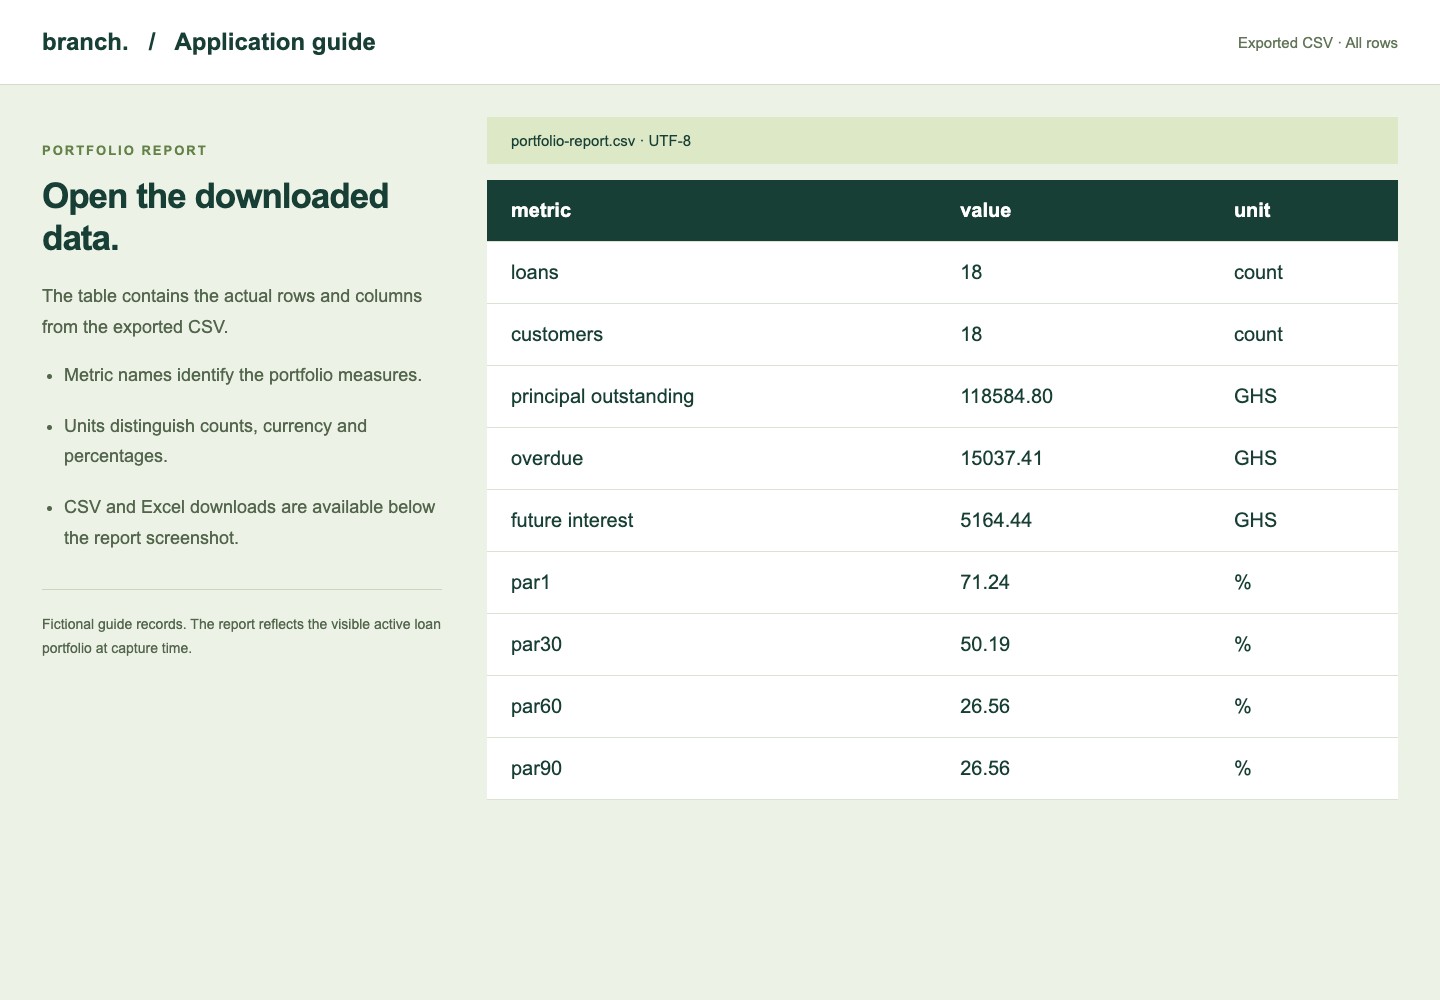
- Download the portfolio report (CSV) (opens in a new tab)
Open in a spreadsheet to inspect the complete exported rows and columns.
- Download the portfolio report (Excel) (opens in a new tab)
The same portfolio export in a formatted workbook.
Receive enquiries and give account holders access
Public forms collect information from visitors. Invited account holders use a separate portal to view their own records.
- Who
- Owner / administrator · Authorized staff · Customers and investors
- Where
- Configuration → Public forms · Access → Portal access
- In Public forms, create a form with clearly named fields, mark required answers and activate it. Open the form’s details to copy its public address or use it in your website’s embed block.
- Review incoming Submissions. Where appropriate, use Create customer or the loan conversion action, complete the required details and save. Loan records still follow the normal review and payout process.
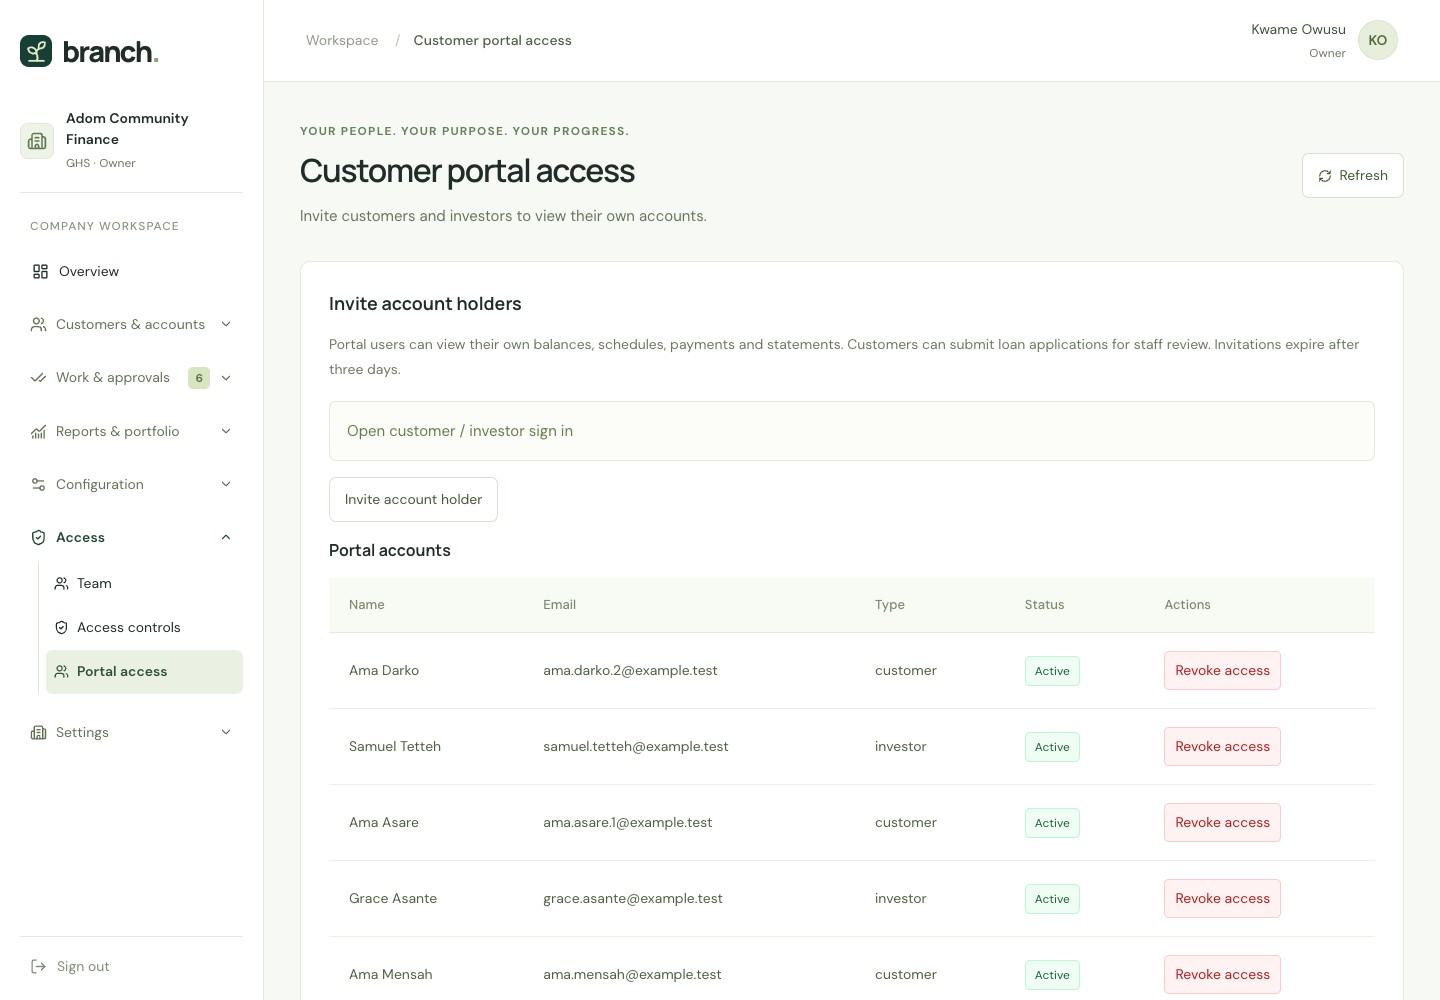
- In Portal access, select Invite account holder. Choose the customer or investor, check that their profile has the correct email, then select Email portal invitation.
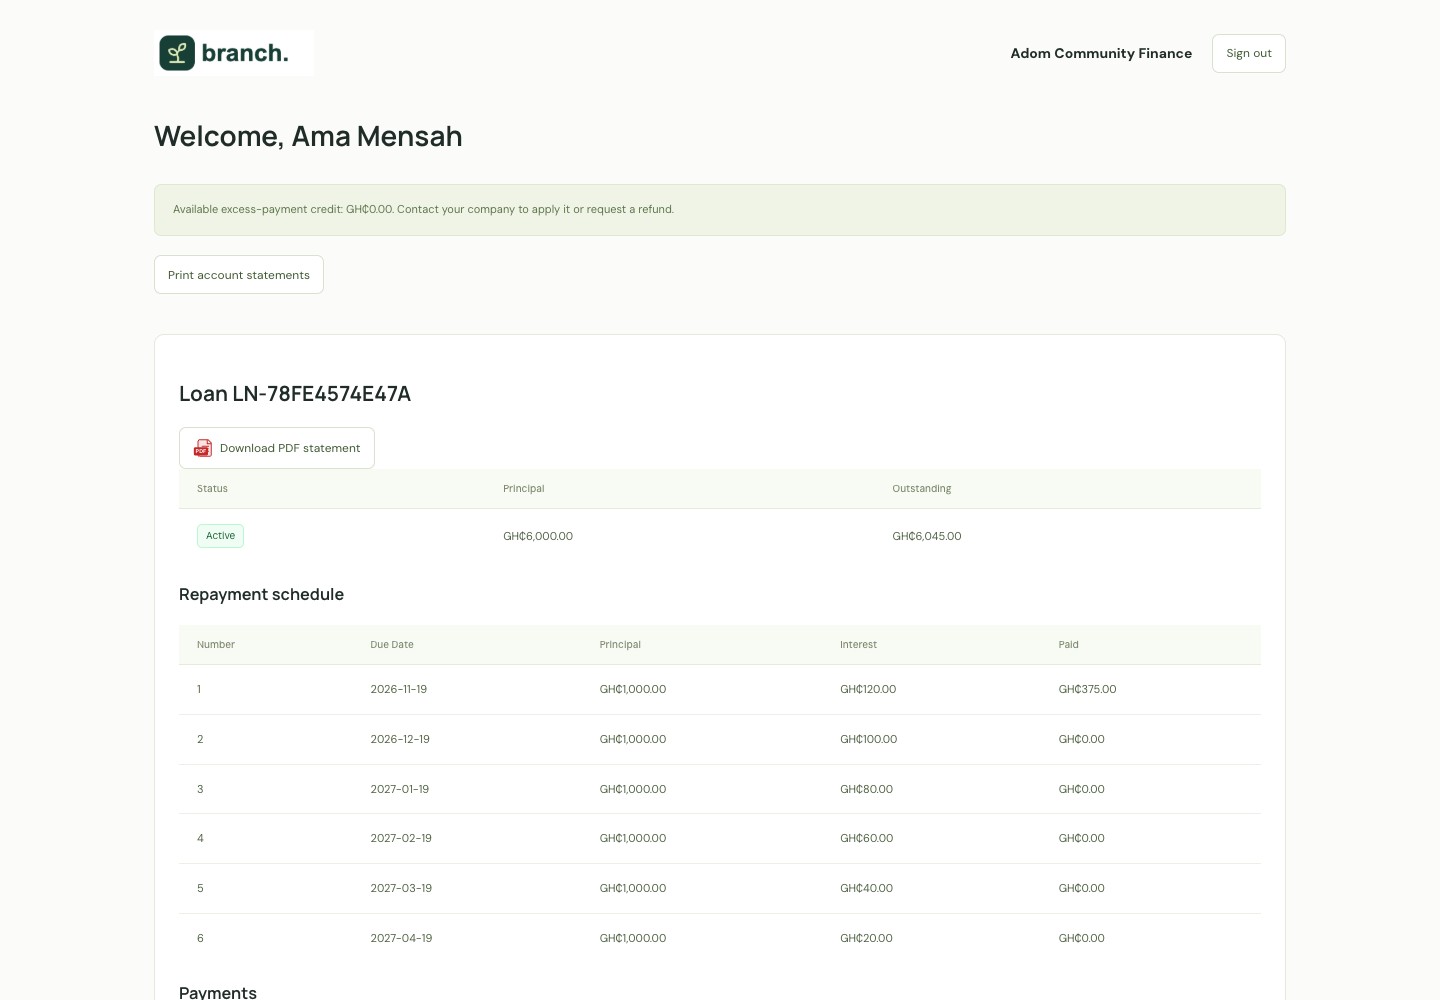
- The recipient opens the invitation and sets a password. They later use customer / investor sign in to view their own balances, schedules, payments, documents and statements. Customers can submit loan applications for staff review.
Keep in mindPortal invitations expire after three days. Staff can revoke access. Secured portal applications remain drafts until staff completes the collateral details and evidence.
 View full-size screenshot
 View full-size screenshot
Bring in existing records and check uploaded files
A CSV is a spreadsheet saved as plain rows and columns. Use the provided template so Branch can read each field correctly.
- Who
- Staff with permission for the relevant records
- Where
- Customers → Import customers · Configuration → Bulk imports
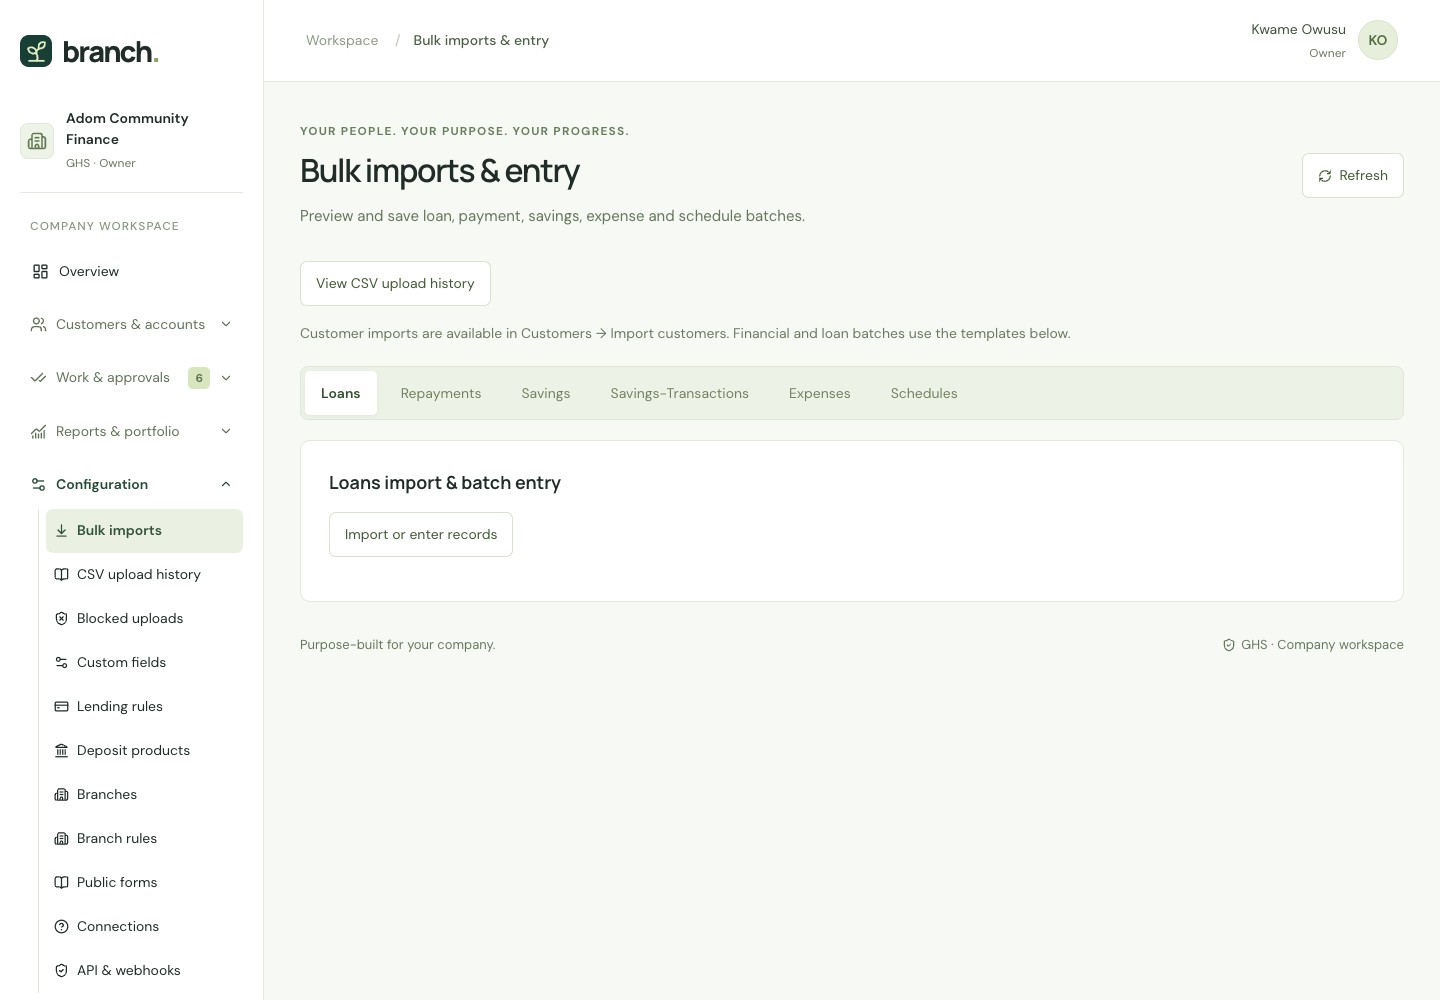
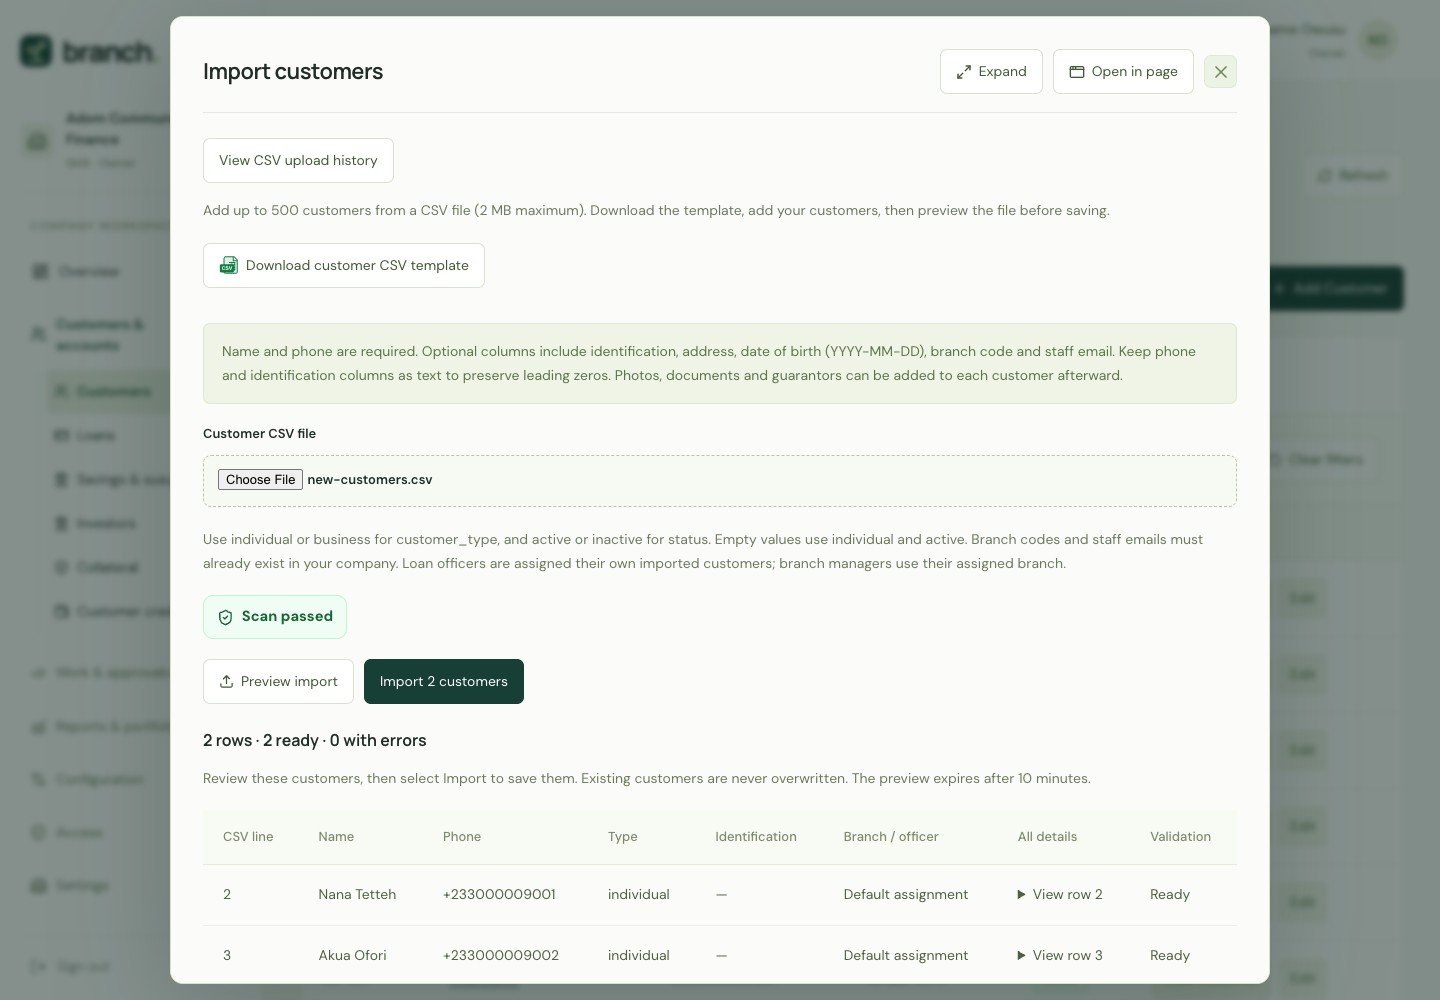
- For customers, select Import customers in Customers. For loans, payments, savings, expenses or repayment schedules, open Bulk imports and choose the matching type. Download its template.
- Fill the template with up to 500 rows and save it as CSV UTF-8, no larger than 2 MB. Keep phone and identification columns as text to preserve leading zeros; use existing branch codes and staff emails.
- Upload the file and select Preview import or Preview batch. Wait for the file check, then review every row and correct all errors. A preview does not create business records.
- Confirm the valid, unchanged preview within ten minutes. Review the saved records and any pending approvals. Use CSV upload history to find retained source files, and Blocked uploads to inspect rejected files.
Keep in mindConfirm financial imports only for actual payments or receipts. Importing does not bypass approval requirements, and existing financial records are not overwritten. Add customer photos, files and guarantors separately afterward.
 View full-size screenshot
 View full-size screenshot
Enter a small batch without a file
- In Bulk imports, open Import or enter records, then select Enter several records. Enter up to 30 rows and add rows as needed.
- Preview the batch, fix errors and confirm it using the same review process as a file upload.
Adapt records, documents and access
Use company controls to collect the right information and give staff appropriate responsibilities.
- Who
- Owner · Administrator
- Where
- Configuration → Custom fields / Branch rules · Access → Access controls
- In Custom fields, choose the record type and add a clearly named field with the correct type and required status. New forms and supported imports use these fields.
- Use the Numbering and Branding tabs to set record references, document names and date and number formats.
- In Document Templates, create an inactive template, upload its Word file and then activate it. Check the generated agreement or statement from a relevant record before using it operationally.
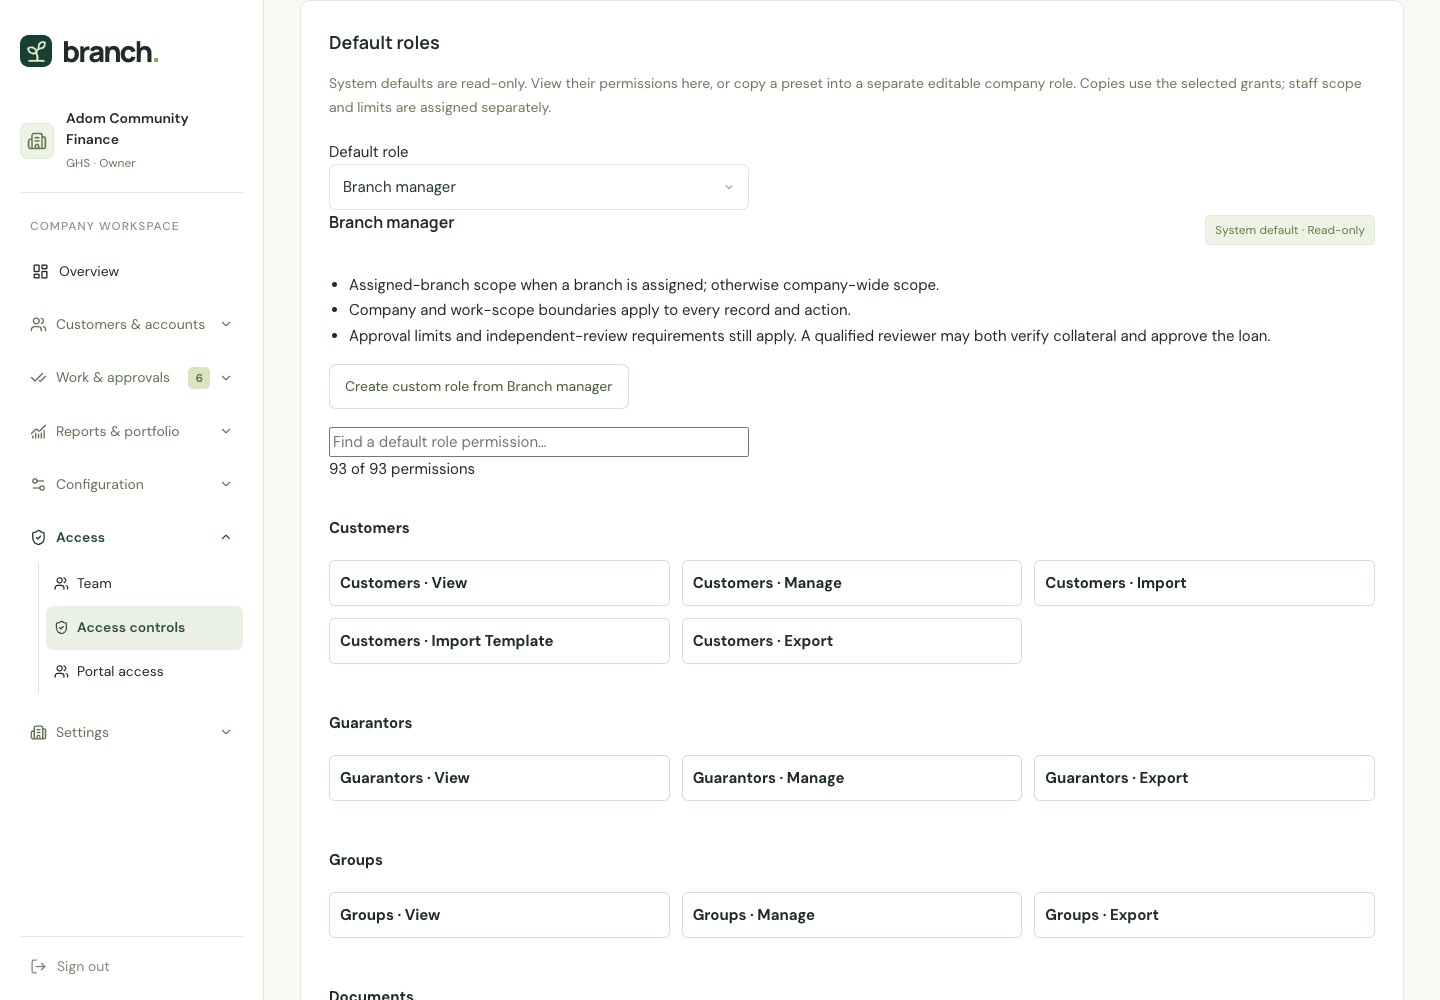
- In Access controls, copy a default role or create a custom role, select its permitted actions and assign it to staff. Use Staff Access for working hours, network or country restrictions; use Staff Profiles for staff details and files.
Keep in mindA staff member’s role, branch, assigned customers and company controls determine which records and actions they can see. If an action is missing, ask the company administrator to check access.
 View full-size screenshot
Inspect and copy a default role
- In Access controls, scroll to Default roles and choose a role to inspect its read-only permissions and operating limits.
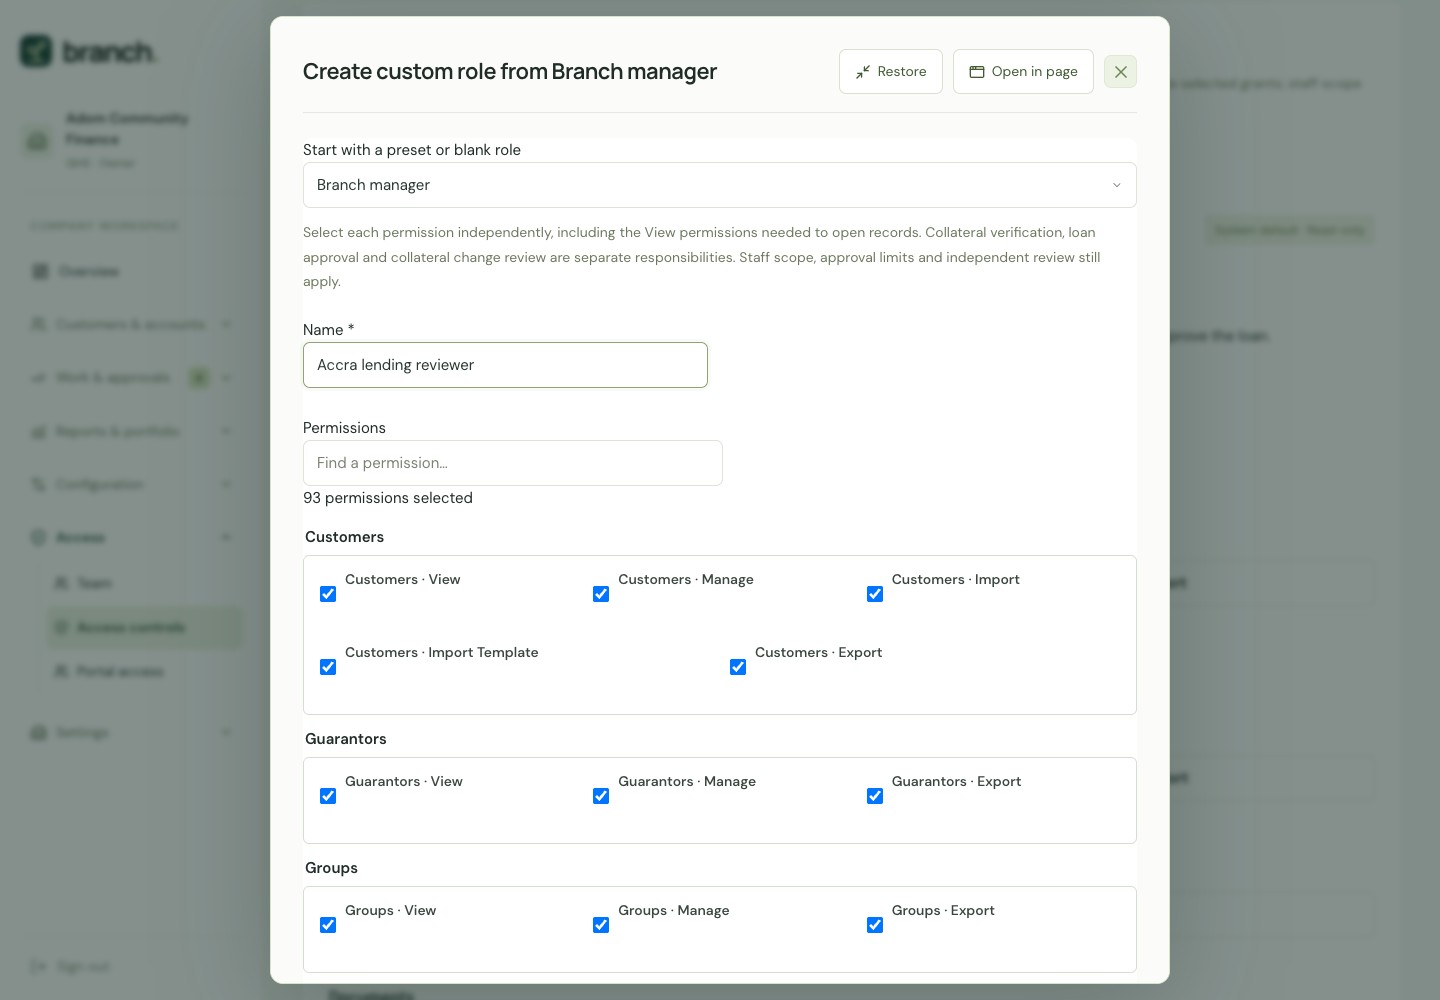
- Select Create custom role from the chosen default. Give the copy a name and review each permission independently; View permissions, collateral verification, loan approval and disbursement are separate actions.
- Use Expand or Open in page to review the form comfortably. Save the custom role only after checking the selected permissions, then assign the appropriate staff scope and approval limits.
 View full-size screenshot
Connect payments, messages and other services
Check connection status before relying on online payments or message delivery. Some services require provider setup by your administrator.
- Who
- Owner · Administrator · Authorized operators
- Where
- Configuration → Connections / API & webhooks · Work & approvals → Messages & automation
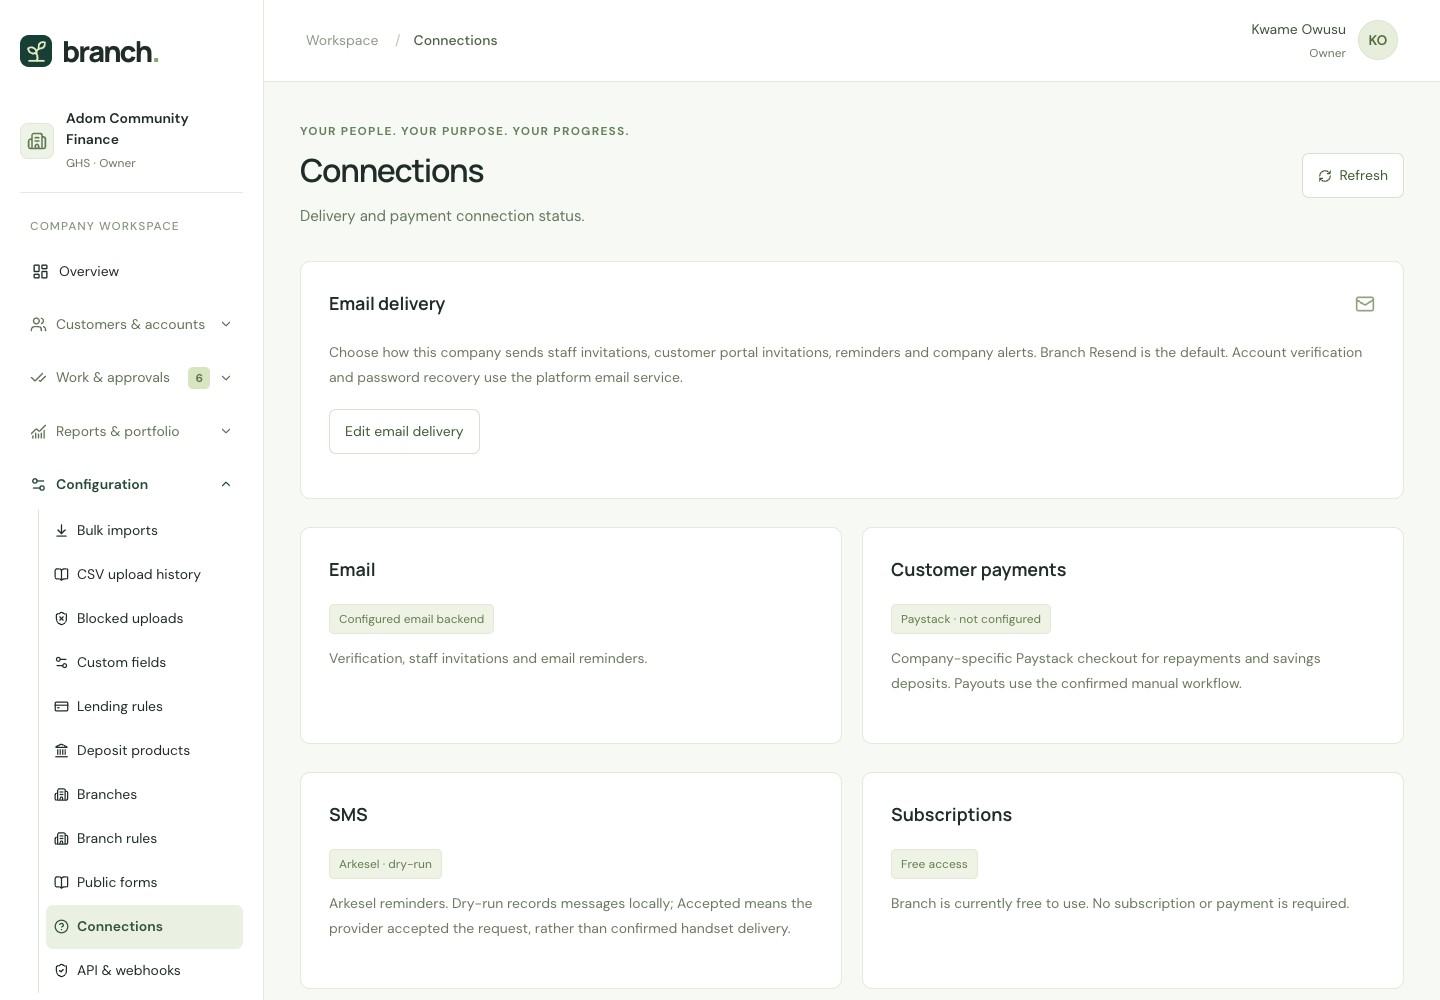
- Open Connections to inspect email, SMS and payment status. In Email delivery, an owner or administrator can save and test the company’s SMTP email connection, or remove it to use the platform service.
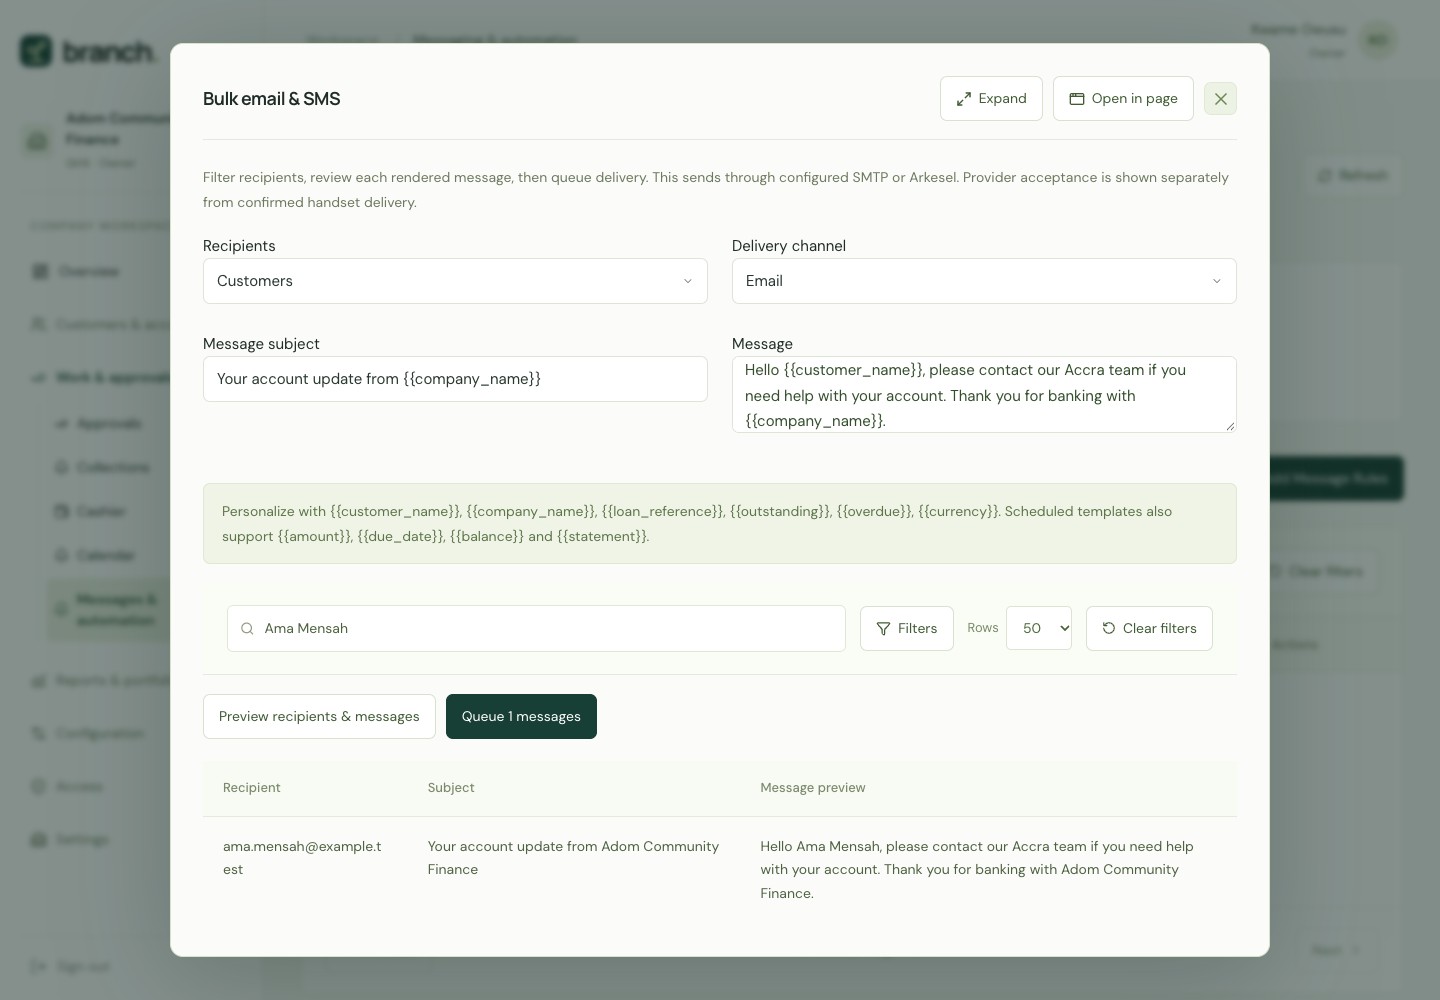
- In Messages & automation, select Compose messages. Choose recipients and filters, write the message, then select Preview recipients & messages. Check each preview before queuing delivery.
- Review Message Dispatches for results. Add event or scheduled Message Rules and enable only the financial Scheduled Jobs the company needs. Scheduled work requires the background service to be running.
- Open Settings → Plan & access to check company usage, staff and branch limits and the displayed billing status. Follow the billing controls only when they are available for your company.
Keep in mindA logged SMS in dry-run mode has not been sent. Accepted means the provider accepted a message, not that the recipient received it. For an unknown delivery result, check with the provider before resending.
 View full-size screenshot
 View full-size screenshot
Connect another system
- Ask a technical administrator to use API & webhooks. They create a key for a named staff member, choose its records and branch, and allow writes only if required. Copy the generated key once and store it privately.
- For outgoing event notifications, create an inactive webhook, configure the receiving system with its signing secret, then activate it. Review Webhook Deliveries and investigate failed or uncertain results before retrying. Keys remain limited by the associated staff member’s access.
Platform administration and billing
- Platform administrators use the separate /platform sign-in to manage company suspension, reactivation, plans and quotas. Company owners and staff do not receive platform administrator access from a staff invitation.
- If subscription billing is enabled, the owner can follow Plan & access to the configured Paystack plan or management page. A company with free access does not need a subscription payment. External payment and messaging providers may charge for their own services.
Ready for your next task?
Open your workspace and follow the relevant steps. If a page or action is unavailable, ask your company administrator to check your role and company settings.
Sign in to BranchReturn to the topic index ↑